

How To Draw Water Drops On White Paper
All tutorial photos provided by me.
Lessons For Creating Realistic Water Droplet Art
Anyone who draws or paints will know that mastering the art of creating realistic water images is very difficult and requires different skills and techniques compared to drawing other objects and textures. Because water is transparent, it takes on whatever color is behind it, so when drawing a water drop, all you can add is light and shadow.
This page will hopefully help you to learn how to go about drawing a single water droplet in pencil, although when you have the basic knowledge you can then try drawing a droplet in any media you wish. I have included a few photos of water drops on this page which you can use as your subject, or you can draw a still life of water on a surface such as a car windshield, a water bottle, a sink, a flower, a leaf or a window.
I hope you find this page useful :)
Dewdrop
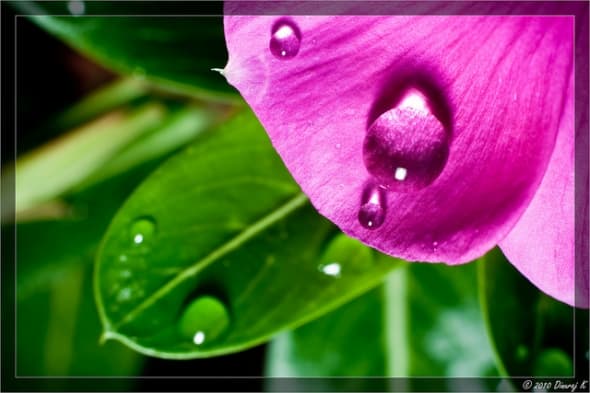
I've put a few photos on this page so you can study them and perhaps use them as the subject of your paintings or drawings. This one gives a great close-up view, with very clear shadows and reflections.
Dinuraj K
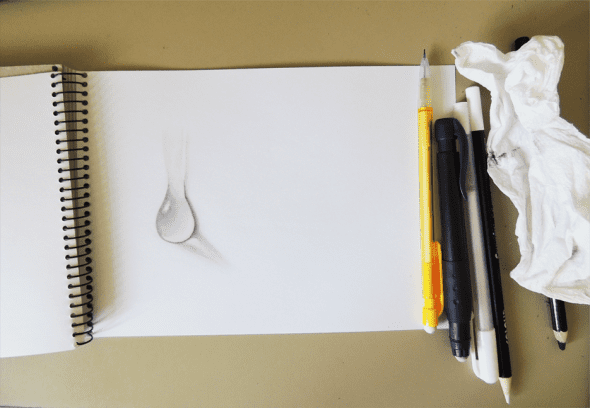
The Setup
All tutorial photos are provided by me.
I should make it clear that I'm not an artist so if I can draw a half decent water drop then you can!
The equipment I used was as follows:
- Any old pencil!; I just used one of those retractable pencils, and I don't even know the grade of it. Any kind of pencil would be fine, but if you have a pencil specifically made for sketching, use that.
- A bit of kitchen roll; I scrunched this into a point to smudge the pencil when needed but it wasn't very efficient...I just didn't have anything else at the time! A tortillon, which is a pointed paper tool used by artists for smudging charcoal/pencil/pastels, would be a wise purchase - or you could make your own.
- A retractable eraser pen; this was useful for me but was quite clumsy and difficult to be accurate with due to the thickness of the eraser (even though I did try to create a point at the end). I would personally suggest you get yourself a cheap kneaded eraser so you can be much more accurate.
- White colored pencil
- Paper: I just used a regular white paper in a sketchbook.
You may also see a charcoal pencil and a white gel pen in the photo. I ended up not using these, but a darker black and brighter white can be achieved with these items if you wish.
All tutorial images are provided by me.
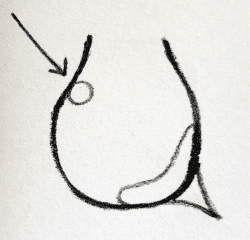
The Anatomy of a Water Droplet
This is a basic outline of a water drop and it gives you an idea of the parts of a drop in terms of light and shadow; in the picture, light is coming into the drop in the direction of the arrow, which creates a bright white dot (reflection) where the light hits. Around this dot is a dark area (not shown here).
On the opposite side of the drop is a reflection arc, and then there is a flow of light leaving the drop onto the surface below. Although not shown, there is a shadow around the edge of the water drop on the opposite side to where the light enters the water.
My Favorite Video Lesson
This is the video I used to learn how to draw a water drop - and I love the angel painting example at the end too so watch out for that :)
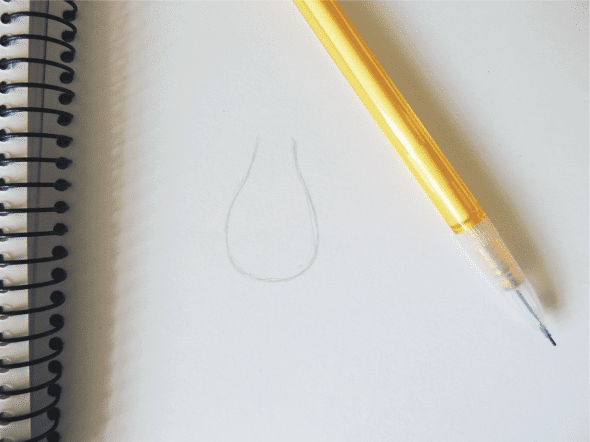
Step 1 - The Outline
All tutorial photos are provided by me.
The first step is to lightly draw the outline of the water drop. It should be a bit bottom-heavy, and should not be perfectly circular.
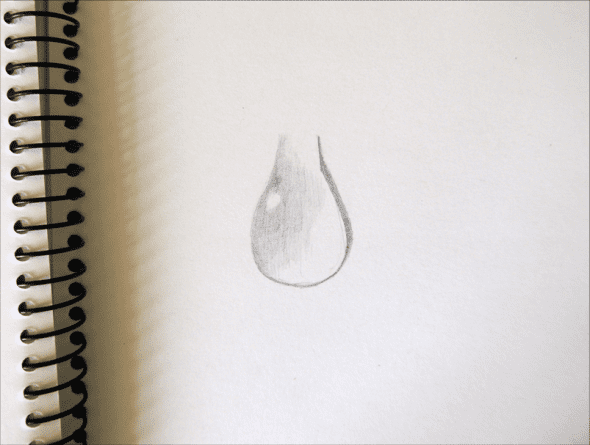
Step 2 - Start Shading
All tutorial photos are provided by me.
Identify where the light is hitting the water (in this case from the top-left) and mark out a small area which will be the reflection. Shade around this area and around the whole of the top-left area. Then add a shadow to the right-hand-side.
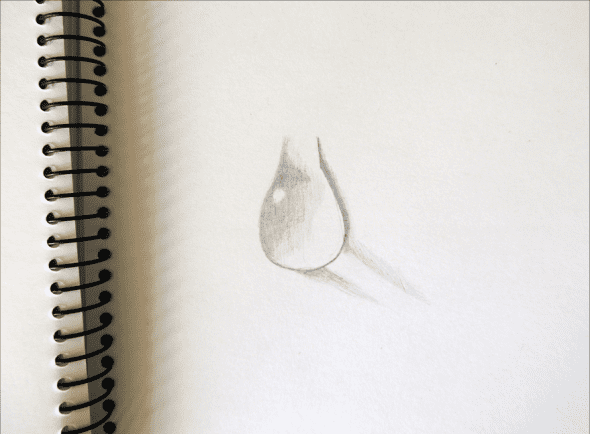
Step 3 - Further Shading
All tutorial photos are provided by me.
Intensify the shaded area as shown above, plus add shaded lines leading from the water drop in the same direction as the light will be travelling through the water.
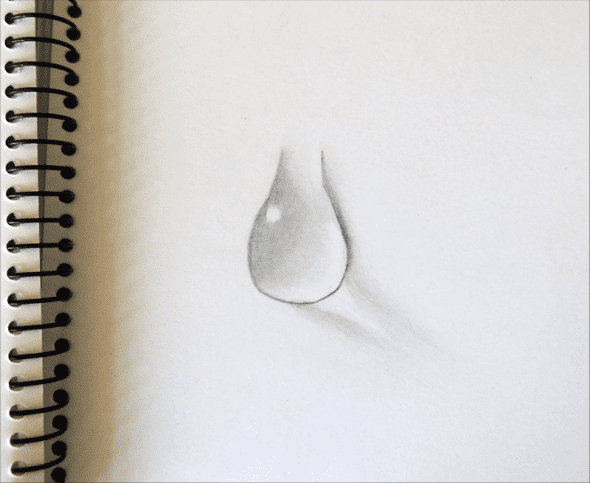
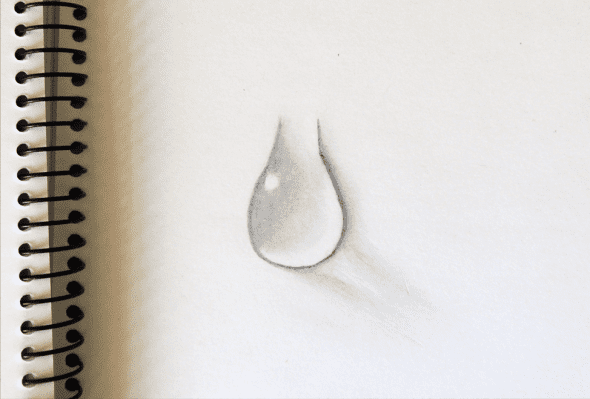
Step 4 - Blending
All tutorial photos are provided by me.
Use your smudging/blending instrument to blend your pencil shading lines together to produce a softer look. Concentrate in the darker areas and try to avoid the reflections and avoid going outside the lines.
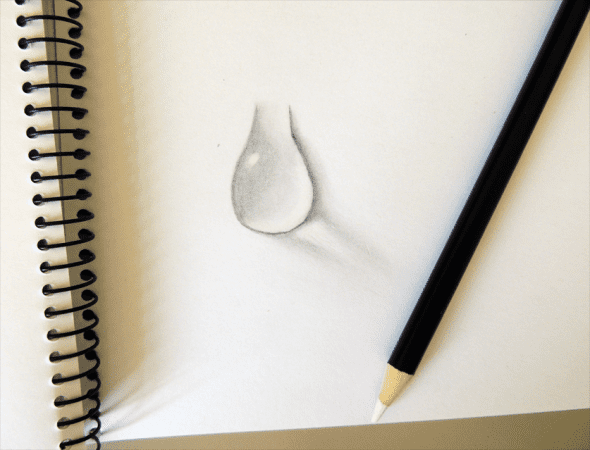
Step 5 - Shadow
All tutorial photos are provided by me.
Strengthen and darken the shadow on the right and bottom-right of the drop, as the smudging will have softened it.
Step 6 - White Pencil
All tutorial photos are provided by me.
At this point I used a white pencil on the reflections, but in hindsight I shouldn't have. If you are using a pure white piece of paper like me there is not point adding white pencil because you won't get brighter white than the background you already have. The best thing you can do is simply use an eraser on the reflection areas to let the white paper background show through. So I would say just ignore this step!
If you want to use a white colored pencil, I would recommend using a non-white piece of drawing paper for more of a contrast and a more stand-out effect. The best choice would be to use a light gray or beige paper I think. When using a non-white piece of paper, a white colored pencil is required for the reflections and should be added as the last step.
Step 7 - Finish the Shading
All tutorial photos are provided by me.
Darken the top-left area and the right-hand-side shadow again, plus put the finishing touches to the rest of the shading and blend your shading once more. Use your eraser to remove any pencil in the reflection areas and anywhere you want to be blank and white.

My Eraser Pen
This is the retractable eraser pen I used for this exercise, and although it was useful it didn't allow for much accuracy. It is good for erasing smudges in larger areas though. Just make sure whatever eraser you choose to use is clean before you use it each time - if it's not, rub it on clean paper to get rid of the pencil graphite on the surface.
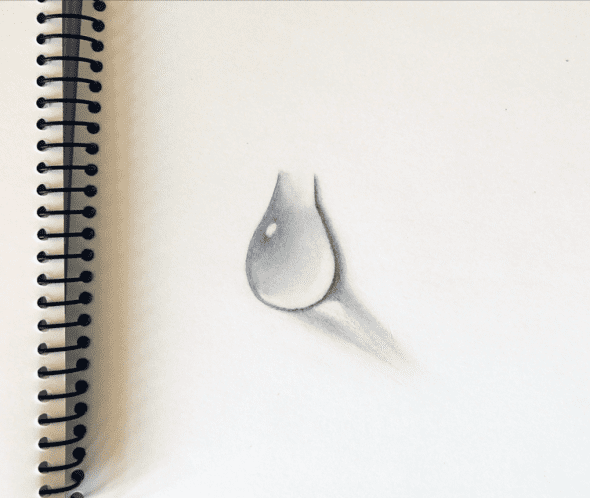
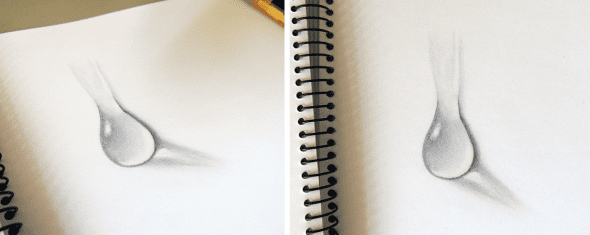
Step 8 - Extend Upwards
All tutorial photos are provided by me.
Extend the drawing to include a thin stream at the top, like you find when a water drop runs down a vertical surface. This stream will be shallow so not much shading is required, as seen above. Do light shading which fades towards the top, and then blend.
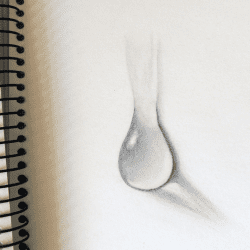
Make any final touches you want to the whole image.
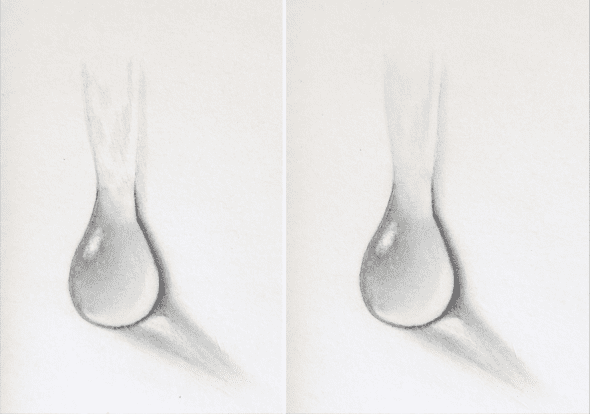
Finished!
All tutorial photos are provided by me.
You will now have a finished drawing, yay!
You can work on the drawing for as long as you want but in total it will probably take you 15-30 minutes. Just bear in mind that it is possible to overwork it so if you're not sure what else can be done, leave it to one side and come back to it later. With a fresh look you will be able to see the bigger picture and assess whether it does in fact look like a water drop, and it will be easier to see what needs to be worked on.
Good luck and have fun!
Rain on a Window
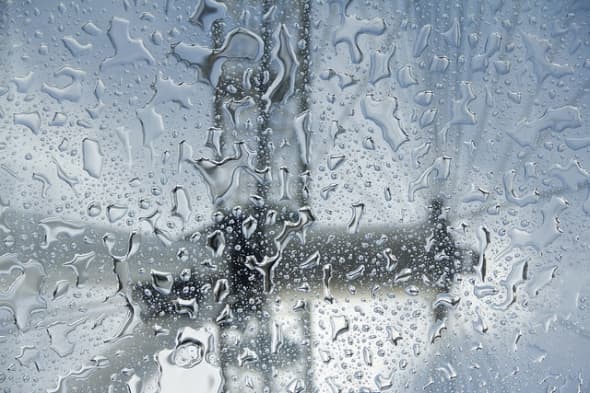
Lots of drops to have a go at drawing here!
Natesh Ramasamy
Lots of drops to have a go at drawing here!
Photo by Natesh Ramasamy.
More Video Tutorials For Drawing Water - Includes Charcoal, Colored Pencil & Painting Lessons
Handy Drawing Materials
As noted above, I use retractable eraser pens for general use as well as for this particular water drop drawing. I have therefore listed a 5-star rated pack of these, plus a kneadable eraser (which I would suggest is the best choice for art-specific use), a sandpaper pencil pointer, tortillions which are perfectly designed for blending pencil lines, and white colored pencils for creating bright reflections. All of which would be very useful for creating water drop sketches.
Water Droplet Tutorials & Tips - Instructions for Painting or Drawing Water
- Light and Shadow
Learn to really look at water droplets. I like the foam plate tip too. - Simple Guide
Quick step-by-step for pencil drawn drops. - 6-Step Explanation
A diagram showing how black and white pastels can be used. - Colored Pencils on Black Paper
Try this technique for a darker style. - Watercolor Drops
Tips for painting water with watercolor paints. - How To Paint a Watercolor Droplet
Making use of masking fluid for the reflections. - Anatomy of a Waterdrop
With a very helpful accompanying video. - Oil Painting Drips & Drops #1
Four steps for painting drips on vertical surfaces. - Oil Painting Drips & Drops #2
Steps showing how to paint drips on horizontal surfaces.
Water Drops on Leaves
Fantastically Realistic Water Art - Examples for Inspiration
- Gregory Thielker
I love these photorealistic windscreen paintings. - Oil Paintings by Alyssa Monks
I love the misted glass painting - so clever! - Charcoal Water Drawings
Amazing series of four artworks. - Hyperrealistic Paintings by Linnea Strid
An incredible and vivid style of painting in oils. - Elizabeth Patterson
Believable paintings of rain-streaked car windshields.
Inspiring Demonstrations & Time Lapse Videos - A Variety of Water Art
CM on November 12, 2019:
Your have made drawing water more understandable. Thank you!
Toni Arrington Dean on May 21, 2019:
I enjoyed your tutorial. Thank you!
ayesha zulqurnain from pakistan on October 16, 2018:
informative!
Lisansia Johnson from Dar es Salaam on September 25, 2018:
this is a great way to learn how to draw things and make them look so real...i love it
Absolutely brilliant. Excellent tutor on May 07, 2018:
Excellent tutor.Brilliant artist.You have inspired me to draw.Thank you.
ahmedbream on February 18, 2018:
good
Shantal Siomara Phillips from Utah on January 24, 2018:
thank you for all the great advice on how to do the shading part and also great water drop loved it :)
NIMI JOHN on December 13, 2017:
Wow!!! Thank you for your drawing class, I'm a beginner in drawings, your class is very very helpful. My dream is draw very well
tburke@carolina.rr.com on September 09, 2017:
Love the large work with dozens of rain drops. Looks like a drawing or is it a painting? Just beautiful!
Halina on July 19, 2017:
Thanks for sharing! :) How great it is !!!
Eli Lili on December 07, 2016:
Awesome! :D
AbsorbArt from United States on October 08, 2016:
Seems simple enough! It's interesting how with just the right shading something can look realistic!
Meshack Nkosi on August 15, 2016:
Wow, I have learnt an easy way on how to draw a water droplet, thank you very much itvwas helpful.
michael on August 03, 2016:
Leonardo, this video on water drops is great and very helpful! Congratulations and thank you!
An v d ham on March 16, 2016:
Amazing, y Love drawing and painting.
hanna on April 15, 2015:
Wow that's realy cool
Kristen Howe from Northeast Ohio on March 29, 2015:
Real cool and awesome, Wellington. Nice work on the hub! Voted up!
Ellen Moss on January 27, 2015:
Thank you very much; your instructions are so helpful. I appreciate your video; enjoyed the whole thing and printed it out. And now, to work!
Thanks again.
Ellen
NY
celi on December 15, 2014:
Adorei!!!!! Os desenhos ficam reais...obrigada!!!!!
Street-Wear-Buff on November 30, 2014:
Well put together! My water drops were always so linear... Until now!
Thanks
Laura Smith from Pittsburgh, PA on November 04, 2014:
This is really helpful. Water is so hard to draw. I just tried a tidal wave, and it was so difficult. I hope you post more tutorials.
Besarien from South Florida on October 20, 2014:
I agree with everyone who thinks you are an artist. Thanks for a great tutorial.
invictus95 on August 09, 2014:
This is a great tutorial. Good job on the water drop!
pennyovenden on June 05, 2014:
Excellent stuff.
captainbky on February 23, 2014:
Brilliant, I loved it and cannot wait to try it myself. thanks.
Michelllle on December 04, 2013:
Love this!
chocochipchip on November 20, 2013:
I love your tutorial! Very helpful! Thanks a lot! ;)
MaggieTee on November 12, 2013:
Great explanation, excellent examples.
drawlikeapro.net
MaggieTee on November 12, 2013:
You say you are not an artist, but I disagree. Perhaps you're not a Paid Artist; but you definitely are an artist! Good work, great explanation.
anonymous on August 14, 2013:
It looks amazing.
anonymous on August 13, 2013:
this is so awsm...dude..i wish i can do that...i am impress
simonne-lee on August 13, 2013:
Great explanation - can't wait to try it
anonymous on August 12, 2013:
That is amazing. I have always been rubbish at drawing but your directions explain fully how to re-create your excellent work!
sbconcepts on August 12, 2013:
This is great, I've always wondered how artists do this.
Torrs13 on August 12, 2013:
How cool! I've never been good at drawing, but this tutorial seems easy to follow.
SamanthaHaupt on August 10, 2013:
Great tutorial, it looks amazing! I'm going to have to try this.
mina009 on August 09, 2013:
Very interesting drawing tutorial!
Kaliopekaty on August 08, 2013:
Thanks, interesting stuff!
NuttSoRuff on August 07, 2013:
very cool!
wellingtonboot (author) from U.K. on August 07, 2013:
@frenchlingo: This one is quite good:
http://www.wikihow.com/Draw-with-Realistic-Shading
But there are tons of drawing websites available online that are very helpful :)
frenchlingo on August 07, 2013:
Simple yet very effective technique. Do you know of good resources I could refer to to learn more about shading?
dellgirl on August 06, 2013:
Thanks for sharing these Lessons For Creating Realistic Water Droplet Art. Keep up the good work.
Rick King from Charleston, SC on August 06, 2013:
Very simple, but a great way to pull people in. I almost think I could draw a raindrop now.
DusanGerald on August 05, 2013:
cool lense made me want to try
girlfriendfactory on August 05, 2013:
Wow, great job! My problem definitely revolves around the lighting ~ I have no comprehension of how to create the shadows and the light (without graphic tools that give you global lighting lol). I'm so excited now! :-)
anonymous on August 05, 2013:
soooo real! wow.. great lens!
rubiduong on August 04, 2013:
Great lens, thanks
creativecreditcooperativesociety on August 03, 2013:
its just amazing
msnz on August 02, 2013:
Great lens. I will try this...
HughSmulders LM on August 02, 2013:
What an awesome tutorial. With its help, it seems not so hard to be good at paper and pencil!
Meganhere on August 01, 2013:
Wow, you make that look so easy!
maryseena on August 01, 2013:
It's really impressive, and you say you're not an artist! You're better than many!
irminia on August 01, 2013:
Thanks for the explanation - I will try in other media
myshedplansplus on August 01, 2013:
Thanks for sharing this... the main component is to draw EXACTLY what you see... every shade, every nuance... the highlights and the shade, that is if you want a realistic rendition. Spot on for showing how to render. Great lens
Michey LM on July 31, 2013:
Very detailed lesson, really step by step Thanks
SusanAston on July 31, 2013:
I think you are an artist! That water drop looks very real.
Raymond Eagar on July 31, 2013:
neat I do more in oils
mcsburlea on July 30, 2013:
very cool lens
Northerntrials on July 30, 2013:
It is all so simple when broken down into steps. Thanks
rattie lm on July 30, 2013:
I can't wait to give this a go! Excellent lens. Thanks.
Varliukas on July 29, 2013:
Very nice!Thank you for sharing that :)
ChocolateLily on July 29, 2013:
Not an artist? You've done beautifully!
OnurTr on July 29, 2013:
Really So realistic. Great jobs. Thanks for sharing :)
Virginia Allain from Central Florida on July 29, 2013:
Excellent job explaining this. Your steps are clear and the photos really help.
JBVenturing on July 29, 2013:
That's cool! Thank you.
DLeighAlexander on July 29, 2013:
Nice tutorial on drawing water. I learned in art class that drawing anything correctly is first about learning to see it correctly.
LynetteBell from Christchurch, New Zealand on July 29, 2013:
Your water drop is so realistic!
wellingtonboot (author) from U.K. on July 29, 2013:
Aww thanks guys!
anonymous on July 29, 2013:
all i can say is WOW, now you got me coming back to my artist side. very nice lens
katiecolette on July 29, 2013:
Your water drop turned out great! Thanks for sharing your tutorial - I will try it out :)
amosvee on July 29, 2013:
I think that you are, in fact, an artist. I am not, but wish that I could see things the way artists see them.
Gayle Dowell from Kansas on July 29, 2013:
Great tutorial on painting water drops. Artists have a way of "seeing" exactly what is there in reality. This is a great example of examining the subject and understanding what is seen and how to interpret that onto paper.
Gregory Moore from Louisville, KY on July 29, 2013:
I wish I had the talent to draw. I can draw a pretty mean stick man, but past that a kindergartener can draw better than me.
Nancy Tate Hellams from Pendleton, SC on July 29, 2013:
Wow, this is great. Thanks for a great tutorial on how to draw a water drop. Loved the videos and your drawings.
DreyaB on July 29, 2013:
This is really great and the main video was fab. Thanks for sharing. :)
Julia Morais on July 29, 2013:
Wow...the drop of water really looks realistic. You make it sound so easy, yet I'm pretty sure I might screw it up...haha. Anyway, great lens.
Fay Favored from USA on July 28, 2013:
So cool. You did a great job showing us how to make a water drop. Congrats for making the front page also.
Mary Stephenson from California on July 28, 2013:
Thanks for sharing. It looks easy when you are shown. But it makes all the difference on how drawings turn out with all those fine details.
How To Draw Water Drops On White Paper
Source: https://discover.hubpages.com/art/how-to-draw-a-water-drop
Posted by: gordonopoetinat1997.blogspot.com
0 Response to "How To Draw Water Drops On White Paper"
Post a Comment