

How To Draw A Roof
Today I will show you how to draw a roof, shingles, and eaves by using simple Two Point Perspective techniques. If you know how to use perspective techniques, you can draw almost anything realistically. I will show you below in easy-to-follow step by step instructions how to draw a house's roof. The simple instructions are below.
If you want a more detailed guide to perspective, we have a few of them here.
You Might Also Like Our Other Perspective Drawing Tutorials
Learn How to Draw a Roof and Shingles with 2 Point Perspective – Simple Steps Drawing Lesson

Written-Out Step by Step Drawing Instructions
(Step 1) Draw a horizontal line across the apge. This is the horizon line. At the right end will be the right-vanishing-point. At the left end will be the left-vanishing point. Vanishing points are where the lines will seem to vanish to.
(Step 2) Draw a vertical line in the center of the page.
(Step 3) Draw a line from the top and the bottom of the line over the left vanishing point.
(Step 4) Now draw a vertical line between those 2 lines that you drew to the left vanishing point. Then draw 2 lines to the right vanishing point as well.
(Step 5) Draw a vertical line between those 2 line as well. Notice that we erased lines that we didn't need any longer.
(Step 6) Draw a line to the right vanishing point.
(Step 7) Draw a line to the right and one line to the left vanishing point.
(Step 8) Draw a vertical line until it meets the top line that you drew in the last step.
(Step 9) Draw a line connecting the 2 vertical lines in the back. Draw an 'X' criss-cross from all the corners in the front square.
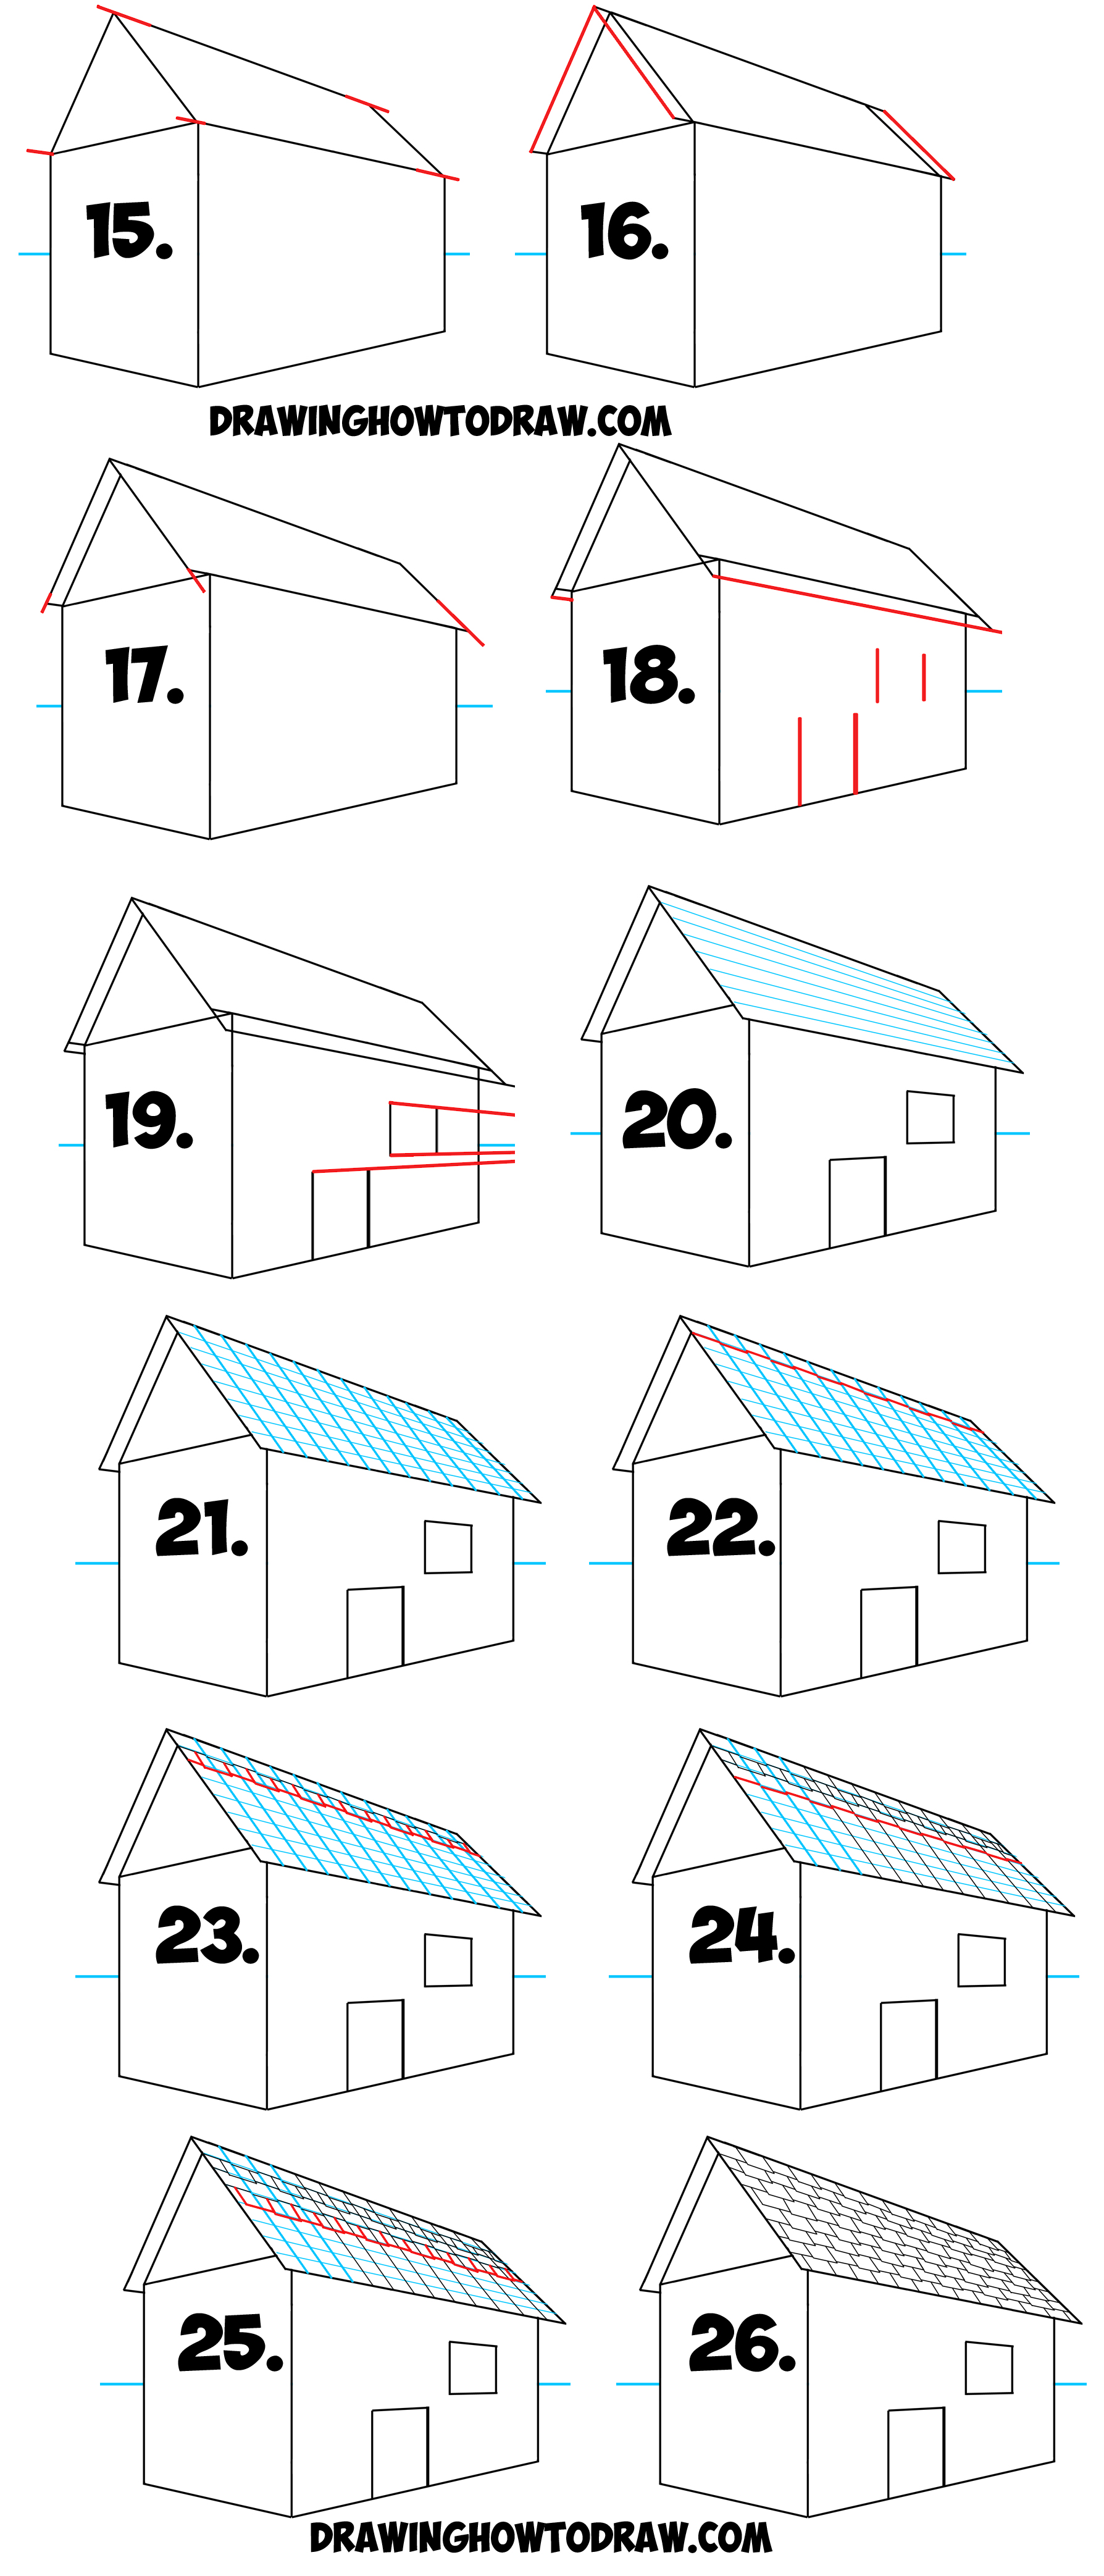
(Step 10) Draw an 'x' to all the corners in the back square.
(Step 11) Draw a vertical line thru the center of the 'x' and draw the front one as high as you want the roof to be.
(Step 12) Draw a line from the front vertical line to the right vanishing point.
(Step 13) Now draw a letter 'v' using the top of the vertical line to the top 2 corners of each square, as I have in the picture.
(Step 14) Now you can erase lines that you no longer need.
(Step 15) Now most roofs don't just stop at the edge of the building. Most roofs go further off the edge of the building. So elongate some of the horizontal lines as we did.
(Step 16) Connect them with lines, as we did.
(Step 17) Elongate the lines that are going downwards as well.
(Step 18) Then draw lines from these downward lines to the right vanishing point. Draw a few vertical lines for a door and window.
(Step 19) Draw lines from the door and window lines to the right vanishing point.
(Step 20) Lightly draw guidelines on the roof towards the right vanishing point. Guidelines are erased at the end.
(Step 21) Lightly draw guide liens in the other direction as well.
(Step 22) For the first row of shingles: Use the guide lines, but go higher then lower, higher then lower, over and over again because you don't want the shingles all to be the same, as that would look un-natural.
(Step 23) For the second row, move the shingles all over to the right (half the length of a tile over). With this row, also, make some higher and some lower to make it look more natural.
(Step 24) Move over to the left again to be in line with the shingles from step #22.
(Step 25) Move over to the right to be in line with the shingles from step #23. Continue doing this until all the rows of your shingles are done.
(Step 26) Then erase lines that you no longer need.
If you want a more detailed guide to perspective, we have a few of them here.
You Might Also Like Our Other Perspective Drawing Tutorials
Technorati Tags: roof, how to draw a roof, how to draw roofs, drawing a roof, drawing roofs, two point perspective, 2 point perspective, perspective, perspective drawing

How To Draw A Roof
Source: https://www.drawinghowtodraw.com/stepbystepdrawinglessons/2016/09/draw-roof-shingles-two-point-perspective-easy-step-step-drawing-tutorial/
Posted by: gordonopoetinat1997.blogspot.com
0 Response to "How To Draw A Roof"
Post a Comment