

How To Create Wood Panel Wall
Expert step-by-step instructions on building a wall, with diagrams, tips for framing with wall studs, how to attach drywall and paneling, and more DIY help
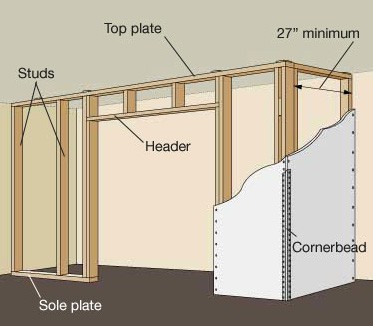
An interior wall is typically built from 2-by-4 or 2-by-6 wall studs and framing, covered with panels of gypsum drywall that are nailed or screwed to the framing members.
How to Build a New Wall: Summary
- Locate the new wall.
- Attach a top plate to the ceiling framing.
- Use a plumb bob to position a bottom ("sole") plate directly beneath the top plate, and nail it to the floor.
- Install wall studs between the top and bottom plates on 16- or 24-inch centers.
- Nail or screw drywall to the studs and plates.
- Apply cornerbead, drywall tape and compound to hide the joints and fasteners.
Many remodeling projects involve building or relocating one or more interior walls. Building a nonbearing interior wall is relatively easy, requiring just basic carpentry skills and tools.
Depending on the nature of your existing floor, walls, and ceiling, you may have to peel away some surface materials to provide for secure attachment at the top, bottom, and ends of the new wall. If the new wall won't butt into studs at the connecting wall or fall directly beneath a ceiling joist, you must install nailing blocks between the framing pieces.
A typical interior wall has a skeleton of vertical 2-by-4 studs that stand between horizontal 2-by-4 base and top plates. (However, if a wall will contain extensive plumbing, it should be built from 2-by-6 studs and plates.)
Browse Tools for This Project on Amazon
• Combination Squares
• Power Circular Saws
• 4-Foot Levels
• Drywall Tools
• Framing Nailers
• Pancake Air Compressors
The framework is typically covered with gypsum wallboard or lath and plaster; in a bathroom, with water-resistant "green" wallboard and tile backerboard and tile.
Following are the steps for framing a wall. After you finish the framing, refer to the links above right for the techniques used for cutting and attaching drywall or paneling. If this looks like the work will be beyond your skills or if you don't have the necessary tools, hire a framing contractor or carpenter to do the work.
Building an Interior Wall: Step-by-Step
To begin, mark the center line of the new wall across the ceiling. Then measure and mark half the width of the new wall's top plate in each direction. Snap a chalk line between these marks. Plan one stud at each end and, if an end meets a wall, measure 15 1/4 inches to locate the inside edge of the first intermediate stud and then 16 inches to the same edge of each additional stud.
1 On the floor, lay the top and bottom plates side by side. Carefully measure where each wall stud will go and mark perpendicular lines across the plates, using a combination square so the studs will align perfectly.

2 Locate the joists in the ceiling (here we've shown the drywall on the ceiling removed for clarity's sake). Hold the top plate in position along the guideline marked on the ceiling and nail through the ceiling material and into each joist with two 3 1/2-inch nails. (If the new wall runs parallel to the joists, fasten the plate to nailing blocks installed between the joists.)

3 Hang a plumb bob from each end of the top plate on the ceiling to just above the floor and then mark the floor to establish the bottom plate's location directly below it. Snap a chalk line along the floor between the marks as a guide for the bottom plate's edge. Nail the plate with 3-inch nails staggered and spaced every 16 inches.

4 Use stud-framing clips to install each wall stud. Lift the stud into position and line it up on its mark, flush with the edges of the top and bottom plates. Check plumb using a carpenter's level, and nail the stud into place. (Alternatively, you can toenail each stud to both the top and bottom plate with 2 1/2-inch nails, but this is harder to do if you're inexperienced.)

5 Form the connections and corners. Where one wall intersects another, double up studs to receive the intersecting wall. If the wall will turn a corner, frame it with two full-length studs that have blocks sandwiched in between.

NEXT SEE:
•How to Cut Drywall
• How to Hang Drywall
• Soundproofing Walls & Ceilings
• How to Panel a Wall
![]()
How To Create Wood Panel Wall
Source: https://www.hometips.com/diy-how-to/build-a-wall.html
Posted by: gordonopoetinat1997.blogspot.com
0 Response to "How To Create Wood Panel Wall"
Post a Comment