

How To Create Sharepoint Folder
Creating folder in a SharePoint document library is one way to group and manage files. You can create folders from your device when syncing or from the command bar on the web.
Create a folder in SharePoint
-
Go to the SharePoint site, and where you want to create a new folder, open the SharePoint document library.
-
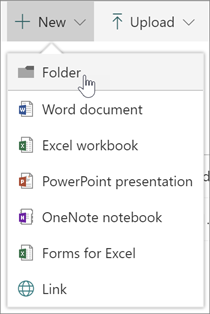
On the menu bar, select+ New, and then selectFolder.
If you don't have folders as an option on the + New menu, they may be turned off. A library owner or a user with design permissions can enable the Folder command. For more info, see Turn folders on in SharePoint.
Note:Does your screen look different than this and you're using SharePoint or ? Your administrator may have SharePoint Classic experience set on the document library. If so, see Create a folder in a SharePoint Classic experience library.
-
In the Folder dialog, enter a folder name in the Folder Name box, and then selectCreate.
Note:To change the folder name later on, select ... (ellipses), and then selectRename. Change the folder name in the Rename dialog, and then selectSave. For more info, see Rename a file, folder, or link in a document library.
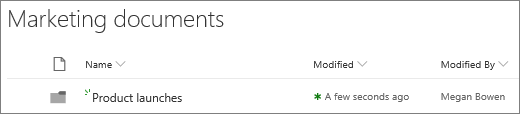
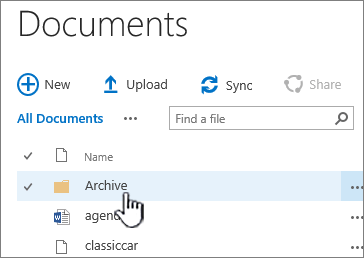
When done, you should see your new folder in the document library and can start adding files or creating subfolders within it. To add a new file, see Create a new file in a document library. To upload existing files, see Upload files and folders to a document library.
-
If you don't see your new folder in the library, refresh your browser.
In some cases, you might consider using views instead of folders. You can filter, group, and sort files in views. If you have a large library, a combination of views and folders might work best.
Turn folders on in SharePoint or SharePoint Server 2019
Folders are on by default, but if they're off and you have permissions, follow these steps:
-
Open the library where you want to start adding folders.
-
Select Settings
 , and then selectLibrary Settings.
-
SelectAdvanced settings.
-
In the Folder section, for Make "New Folder" command available,make sure that the Yes option is selected.
-
SelectOK, and navigate back to your library.
Create a folder in a SharePoint Classic experience library
-
Go to the SharePoint site containing the SharePoint library where you want to add the folder.
-
Select the title of the library on the Quick Launch bar to open it, or selectSettings
 , and selectSite contents, and then select the title of the library you want to add folders to.
Note:Designers can modify the appearance and navigation of a site significantly. If you cannot locate an option, such as a command, button, or link, contact your admin.
-
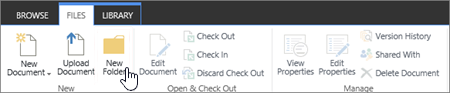
On the ribbon, selectFiles, and then in the New group, selectNew Folder.
Note:If the New Folder command is not available, you can turn it back on with the proper permissions. On the Library tab of the ribbon, selectLibrary Settings, and then selectAdvanced settings. In the Folder section, for Make "New Folder" command available,make sure that the Yes option is selected.
Note: To change the folder name later on, select ...(ellipses) in the dialog, and then selectRename. Change the folder name in the Name box, and then selectSave.
-
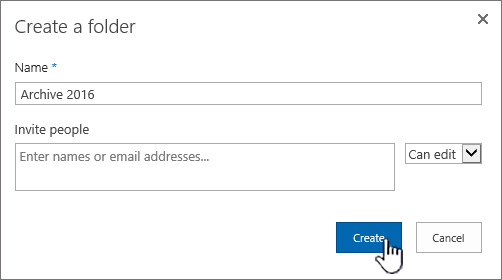
In the Create a folder dialog, enter a folder name in the Name field, and then selectCreate.
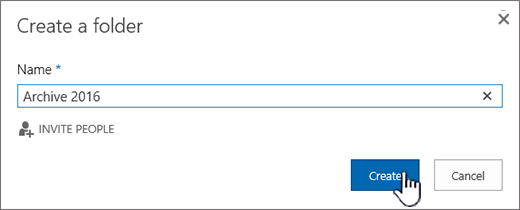
You can optionally invite people to share the folder.
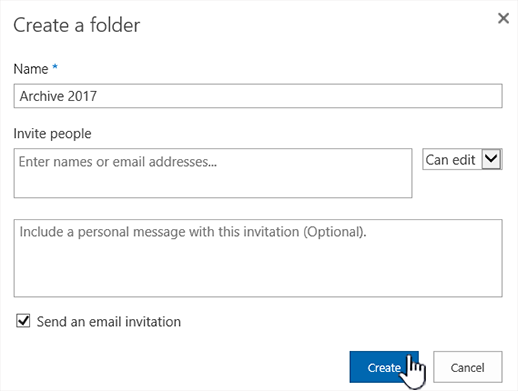
For more info, see Share files or folders in Microsoft 365.
Depending on your situation, you might consider using views instead of folders, because they enable content to be filtered, grouped, and sorted in multiple ways. If you have a large library, a combination of views and folders might work best. For more info about views, see Video: Create and edit public views of a list or library.
Create a folder in SharePoint Server 2016 or SharePoint Server 2013
By default the New Folder command is turned on in SharePoint document libraries. A library owner or a user with design permissions can enable the New Folder command.
-
Go to the site containing the SharePoint document library where you want to add the folder.
-
Select the title of the library on the Quick Launch bar to open it, or selectSettings
, and selectSite contents, and then select the title of the library you want to add folders to.Note:Designers can modify the appearance and navigation of a site significantly. If you cannot locate an option, such as a command, button, or link, contact your administrator.
-
On the ribbon, select the Files tab, and then in the New group, selectNew Folder.
Notes:If the New Folder command is not available, you can turn it back on with the proper permissions.
-
On the Library tab of the ribbon, selectLibrary Settings, and then selectAdvanced settings.
-
In the Folder section, for Make New Folder command available, ensure that the Yes option is selected.
-
SelectOK.
-
-
In the New Folder dialog, enter a folder name in the Name field, and then selectSave.
You can optionally invite people to share the folder.
For more info, see Share documents or folders in SharePoint Server.
-
When you're done, selectCreate.
Notes:
-
To change the folder name later on, select ... (ellipses), and in the dialog, select ... (ellipses), and then selectRename. In the Name field, change the folder name.
If you don't see Rename, selectEdit Properties, and change the Name field. When done, selectSave.
-
To quickly go to the next level up in the folder hierarchy, on the ribbon, select the Library tab, and then selectNavigate Up.
Depending on your situation, you might consider using views instead of folders, because they enable content to be filtered, grouped, and sorted in multiple ways. If you have a large library, a combination of views and folders might work best. For more info about views, see Video: Create and edit public views of a list or library.
Create a folder in SharePoint Server 2010
By default, the New Folder command appears in SharePoint document libraries. A library owner or a user with design permissions for the library can enable the New Folder command.
-
Navigate to the site containing the SharePoint document library for which you want to add the folder.
-
To open the name of the library, on the Quick Launch bar, and select it. Alternatively, selectSite Actions, selectView All Site Content, and then in the appropriate libraries section, select the name of the library.
Note:Designers can modify the appearance and navigation of a site significantly. If you cannot locate an option, such as a command, button, or link, contact your admin.
-
On the ribbon, in the Library Tools section, select the Documents tab, and then in the New group, selectNew Folder.
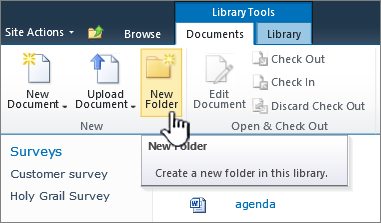
Note:The person who created your library may have specified that folders cannot be created in the library. If this is the case, the New Folder command is not available.
-
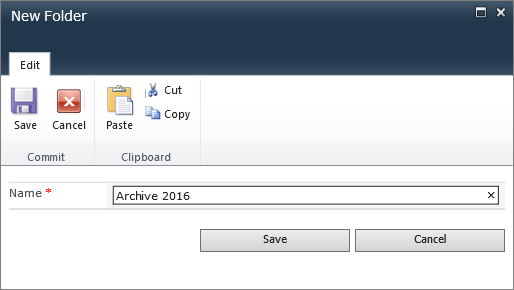
In the New Folder dialog, in the Name field, enter a folder name, and then selectOK.
Note:To change the folder name later on, select the down arrow on the line with the folder, and then selectEdit Properties. In the Name field, change the folder name.
Depending on your situation, you might consider using views instead of folders, because they enable content to be filtered, grouped, and sorted in multiple ways. If you have a large library, a combination of views and folders might work best. For more info, see Create, change, or delete a view.
Create a folder in SharePoint Server 2007
By default, the New Folder menu appears in SharePoint libraries. A library owner can enable the New Folder menu.
-
If the SharePoint document library isn't already open, on the Quick Launch bar, select its name.
-
On the New menu
 , selectNew Folder.
 -
Enter a folder name, and selectOK.
Depending on your situation, you might consider using views instead of folders, because they enable content to be filtered, grouped, and sorted in multiple ways. If you have a large library, a combination of views and folders might work best. For more info, see Create, change, or delete a view.
Other topics on Folders and files
Move or copy a folder, file, or link in a document library
Delete a file, folder, or link from a SharePoint document library
Create a folder in a SharePoint list
Delete a folder from a SharePoint list
How To Create Sharepoint Folder
Source: https://support.microsoft.com/en-us/office/create-a-folder-in-a-document-library-3d6a8c11-2490-4d6b-8837-f25649a69c56
Posted by: gordonopoetinat1997.blogspot.com
0 Response to "How To Create Sharepoint Folder"
Post a Comment