

How To Create A Job Application Form In Wordpress

Do you need to add a simple order form on your WordPress site?
The WPForms online form creator plugin works as an easy order form creator and integrates with Stripe, Authorize.Net, and PayPal payment.
So you can create an order form in just minutes, with as much customization as you need.
You can also create an online order form that generates the order information from customers, but lets you accept payments for the order later.
In this article, we'll show you how to create both a simple order form with online payments and without payments.
Click Here to Start Making Your Order Form Now
WPForms is the best WordPress Form Builder plugin. Get it for free!
Create a WordPress Order Form Video Tutorial
We've created a video that shows you how to create an order form in WordPress.
If you would prefer to read the instructions, we'll walk through the process in the steps below.
How Do I Create an Order Form for My Website?
Here are some quick links for you so you can jump to the right simple order form template you want to use on your site:
How to Create a Simple Order Form With Online Payments:
- Create a Simple Order Form in WordPress
- Configure Your Order Form Notifications
- Configure Your Order Form Confirmations
- Customize the Payment Settings
- Add Your Simple Order Form to Your Site
or
How to Create a Simple Order Form Without Online Payments:
- Create a Simple Order Form in WordPress
- Cutomize Your Order Form Notifications
- Configure Your Order Form Confirmations
- Add Your Simple Order Form to Your Site
How to Create a Simple Order Form with Online Payments
Accepting donations? Or, maybe you want to do something like build a t-shirt order form, a photography order form, or any other order form to collect orders.
Whatever digital or physical products you're selling, you can take payments through an online order form template.
Here we're going to show you how to create a WordPress order form that will accept credit card payments and PayPal payments. So if you want to accept online payments for orders through your site's web-based order form, this is the place to be.
Step 1: Create a Simple Order Form in WordPress
Asking yourself how to make an order form online? The first thing you'll need to do is install and activate the WPForms plugin. For more details, see this step by step guide on how to install a plugin in WordPress.
Next, go to WPForms » Add New to create a new form.
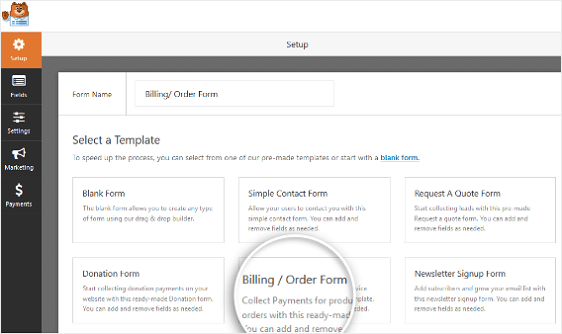
On the setup screen of the order form creator, name your form and select the Billing/Order form template.
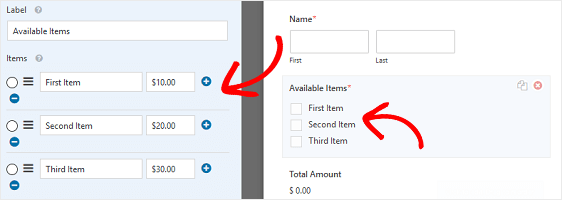
Next, you'll want to modify what items are available to order.
To do this, scroll down to the "Available Items" section on the right that the template includes and click on it.
This will open up the "Field Options" in the left panel. Here you can rename the field, add or remove order items, and change the prices.
If you want to give people images to choose from when filling out your online order form, click on the Use image choices checkbox in the Form Editor.
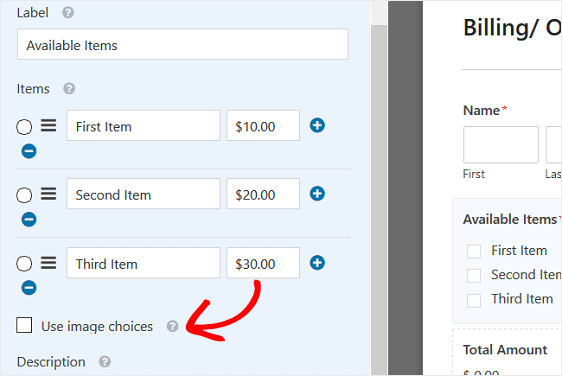
When you do this, you'll be able to upload images to go alongside your items, giving people a peek at what they're ordering.
For help with this step, check out our tutorial on how to add image choices to your WordPress forms. You can also make forms look great by following the steps in our post on how to create a Multi-step form in WordPress. But for the sake of this tutorial, we'll stick with a single page.
Lastly, with the simple drag and drop form builder, you can add additional fields to your order form by dragging them from the left hand side to the right hand side.
If needed, check out our tutorial on how to add product options that change the total price. This is a great trick to do to improve the user experience and lower your online shopping cart abandonment rate.
And, we've got a tutorial for you if you'd like to learn how to use the power of discounts and add a coupon code field to your forms.
Click Save when you're done.
Step 2: Customize Your Form Notifications
There are two settings to configure in your simple order form. The first is the Notifications setting. Notifications are a great way to send an email when your form is submitted.
You can send an email notification to yourself, which WPForms does automatically unless you disable form notifications. You can also send a notification to a member of your team by adding their email to the Send to Email Address field.
In addition, if you use smart tags, you can even send a form notification to a customer to let them know their order has been received.
Let's take a look at how to set up one form notification that will be sent out to a customer after they submit an order form on your website.
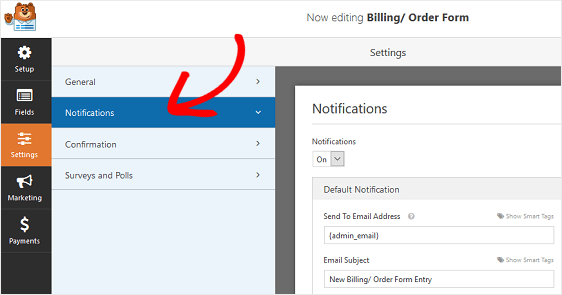
Start by clicking on the Settings tab in the Form Builder and then click Notifications.
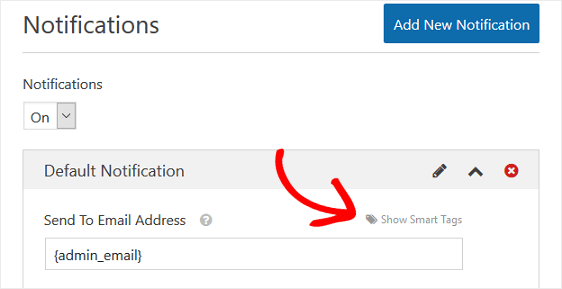
Next, you'll want to customize which email address will receive a notification when a new order is submitted.
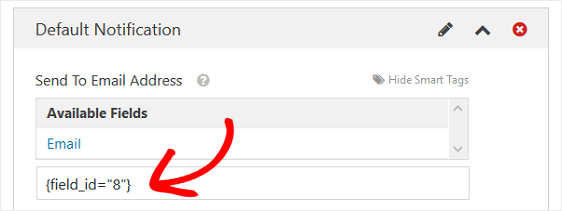
To include the email address of the person that filled out the online order form, which is your customer, click Show Smart Tags in the Send To Email Address field.
Click on Email so WPForms knows to send a notification to the email address that was entered on the order form submission.
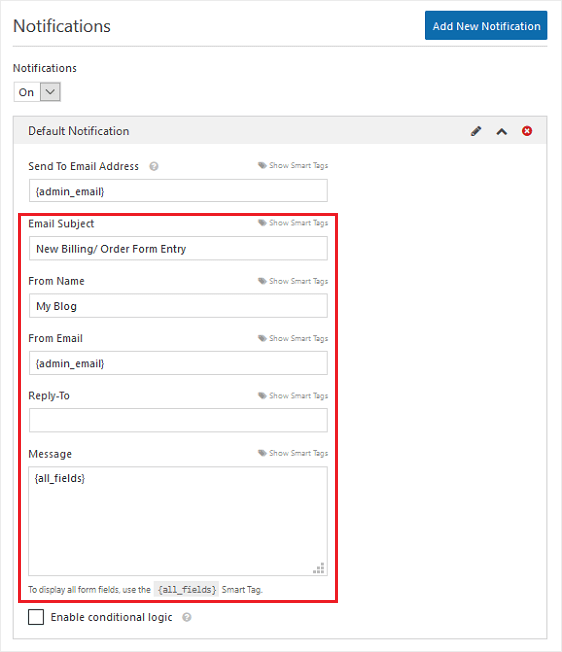
Next, you can change your notification's email subject to be more specific. In addition, you can customize the "From Name", "From Email", and "Reply-To" emails.
And don't forget to include a personalized message if the email is going to anyone but yourself.
If you want to include all of the information found in the form fields of the submitted order form, use the {all_fields} smart tag.
For more help with smart tags, check out this tutorial on how to use smart tags in WPForms.
By changing these fields, you'll know that whoever receives the email notification will know exactly what the notification is for and who it came from.
To send out more than one email notification when an order form is submitted on your website, check out these step by step instructions on how to create multiple form notifications in WordPress forms.
Better yet, if you want, you can send an automatic WordPress order form email receipt to all customers that submit an order.
Step 3: Configure Your Form Confirmations
The second setting to configure deals with form confirmations. Form confirmations are messages that display for customers once they submit an order form.
There are three confirmation types you can choose from:
- Message. This is the default confirmation type in WPForms. When a customer submits an order form, a simple message confirmation will appear letting them know their form was processed. Look here for some great success messages to help boost customer happiness.
- Show Page. This confirmation type will take customers to a specific web page on your site thanking them for their order. For help doing this, check out our tutorial on redirecting customers to a thank you page. In addition, be sure to check out our article on creating effective Thank You pages for boosting customer loyalty.
- Go to URL (Redirect). This option is used when you want to send customers to a different website.
Let's see how to set up a simple form confirmation in WPForms so you can customize the message users will see after submitting their orders.
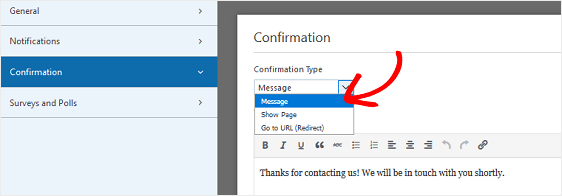
First, click on the Confirmation tab in the Form Editor under Settings.
Next, select the type of confirmation type you'd like to create. For this example, we'll select Message.
Then, customize the confirmation message to your liking, and click Save when you're done.
For help with the other confirmation types, see our documentation on setting up form confirmations. You can also set up email confirmations to know when the order form is completed as you collect orders online.
Step 4: Set up the Payment Settings
Lastly, you'll need to configure the payment settings for your order form by connecting to your payment gateway provider so you can collect online payments from customers.
WPForms offers 3 payment integrations with the most popular payment processors. The plugin integrates with PayPal, Authorize.Net, and Stripe payment processors for accepting payments. When you offer more than one way for your customers to pay, it's a great way to reduce order form abandonment.
To configure the payment information settings on your order form, you'll first have to install and activate the right payment addon.
For easy step by step instructions, check out our tutorial on installing and using the PayPal addon. If you want to use Stripe, you'll find similar instructions for installing and using the Stripe addon here.
Once you've done that, click the Payments tab in the Form Editor.
In our example, we'll set up PayPal to process orders.
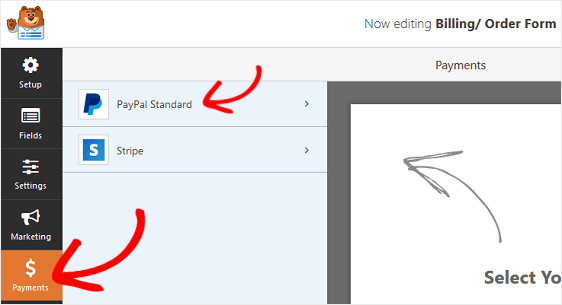
After clicking PayPal, you'll need to enter your PayPal email address, select the Production mode, choose Products and Services, and adjust other settings as needed.

After you're done configuring the payment settings, click Save to store your changes.
Be sure to check out our tutorial on allowing customers to choose their payment method if you want to offer more than one payment option.
Now you're ready to add your simple order form on your site.
Step 5: Add Your Simple Order Form to Your Site
WPForms allows you to add your forms to many places on your website like blog posts, pages, and your sidebar (widget-ready areas).
First let's take a look at the most common post / page embed option.
Start by creating a new post or page in WordPress. After that, click inside the first block (the blank area below your page title) and click on the Add WPForms icon.
![]()
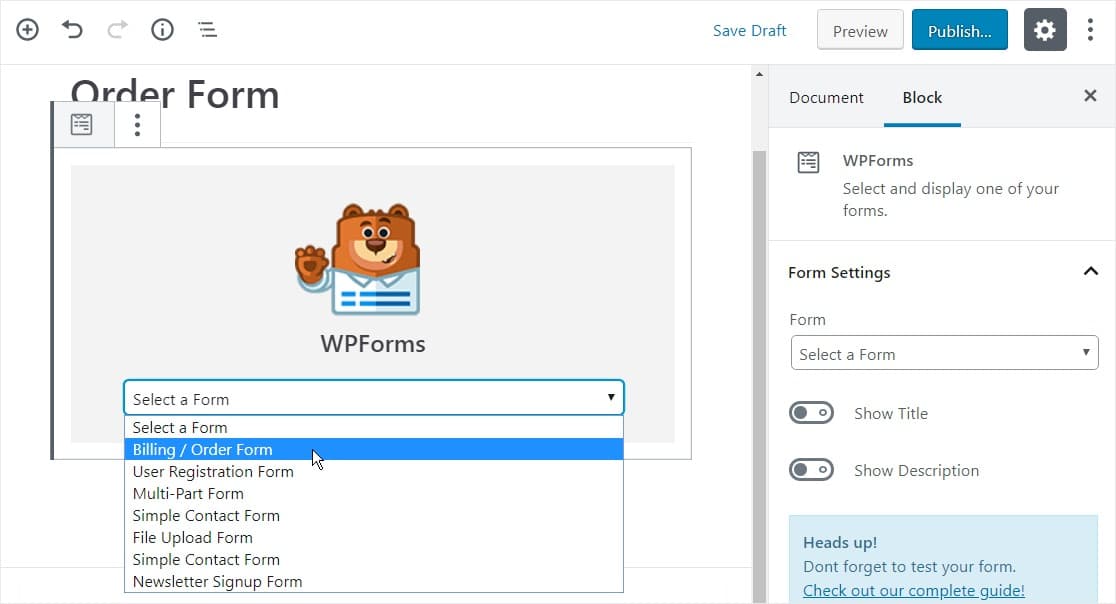
The handy WPForms widget will appear inside of your block. Click on the WPForms dropdown and pick which one of the forms you've already created that you want to insert into your page. Select your order form.
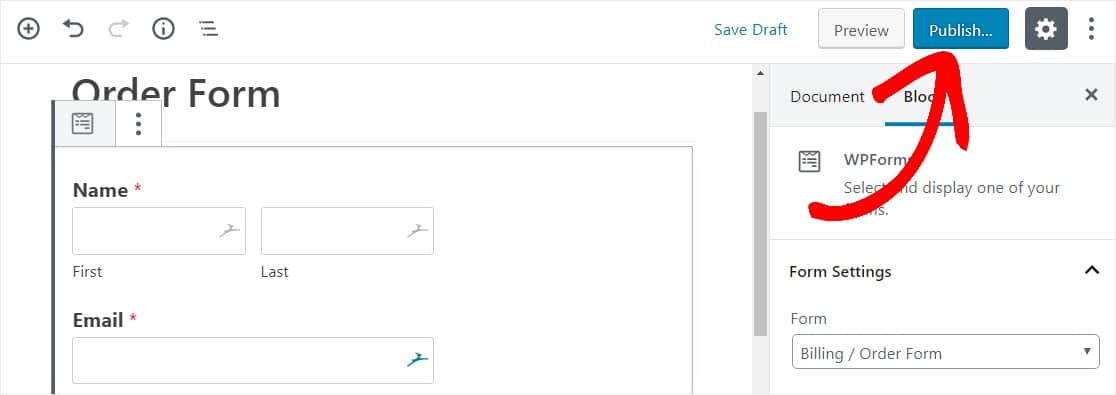
Next, click on the blue button in the top right that says Publish, so your form will appear on your website and you can start taking customer orders.
To add a simple order form to your site in the sidebar widget area, go to Appearance » Widgets.
Then, add a WPForms widget to your sidebar. After that, select the Billing / Order Form from the drop-down menu and save your changes to the widgets area.

Click Save.
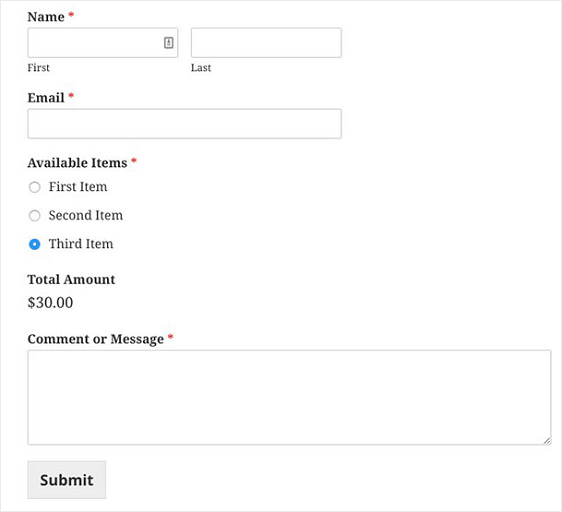
Now you can view your published order form live on your site. Notice when you select items on your form the price changes automatically.
And there you have it! You now know how to create a simple order form in WordPress that accepts online payments.
How to Create a Simple Order Form without Online Payments
There are a few reasons why you might want to avoid collecting payment for orders from your customers through your order form:
- You don't like the idea of accepting credit cards through your website
- Your customers prefer to send checks, money orders, or directly deposit funds from their bank account into yours
- Payment plans are an option for your customers
- You prefer to send official invoices to customers requesting payment
No matter the reason for not wanting to accept online payments, WPForms makes it easy for you to create a simple order form without payment.
Let's take a look at how to do just that.
Step 1: Create a Simple Order Form in WordPress
The first thing you'll need to do is install and activate the WPForms plugin. For more details, see this step by step guide on how to install a plugin in WordPress.
Next, go to WPForms » Add New, name your form, and click on the Billing/Order Form template.
In the Form Editor, you'll be able to customize what items are available for customers to order.
To do this, scroll down to the "Available Items" section in the preview screen on the right and click on it.
This will open up the "Field Options" in the left panel. Here you can rename the field, add or remove order items, and change the prices.
If you want to give people images to choose from when filling out your order form, click on the Use image choices checkbox in the Form Editor.
Doing this will give you the ability to upload images to complement the items you have for sale, while also showing customers an image of the item they're wanting to purchase.
For help with this step, check out our tutorial on how to add image choices to your WordPress contact form.
Lastly, you can add additional fields to your order form by dragging them from the left hand side to the right hand side. This is good for collecting additional contact information from your customers that relate to their order.
Click Save when you're done.
Step 2: Configure Your WordPress Order Form Notifications
Next, you'll need to configure your form's email notifications so you can send customers an email receipt for their order.
This is done by sending multiple notifications at once – one to yourself or the team member in charge of orders so you know an order has been submitted, and one to your customer.
By default, WPForms automatically sends the admin email associated with your WordPress site a form notification unless you turn notifications off. However, to send your customer an email notification as well, you'll need to add another notification.
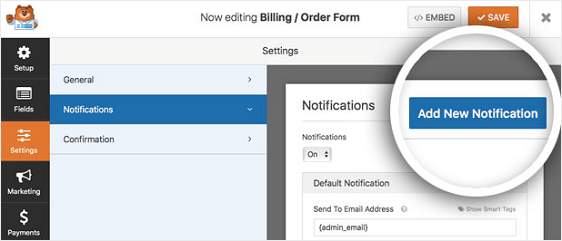
To do this, click on the Notifications tab under Settings in the Form Editor. Then, click on the Add New Notification button.
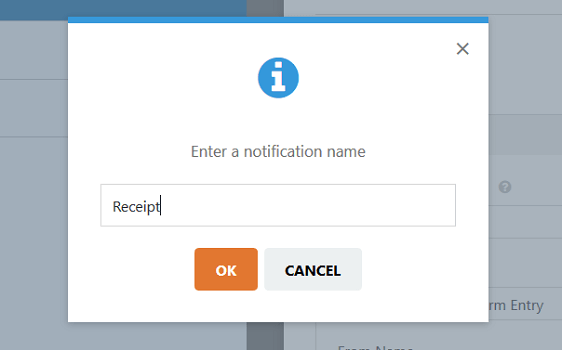
A popup modal will appear. Here you can name your additional notification whatever you want since it's just for your reference. Then, click Okay.
To send this notification to the customer that filled out the order form, click Show Smart Tags next to the Send To Email Address field. Then click on Email.
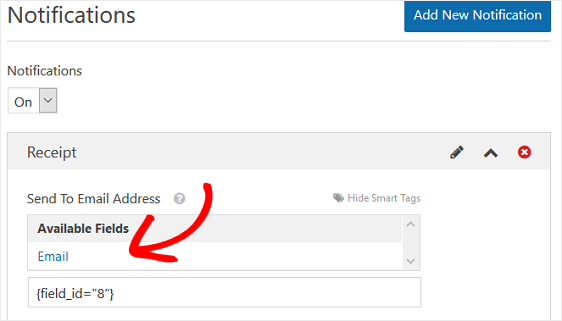
This will tell WPForms that whatever email address was entered on the order form that was submitted should receive a notification.
Next, you can change your notification's email subject line. In addition, you can customize the "From Name", "From Email", and "Reply-To" emails so your customer knows exactly what the email notification they receive is about.
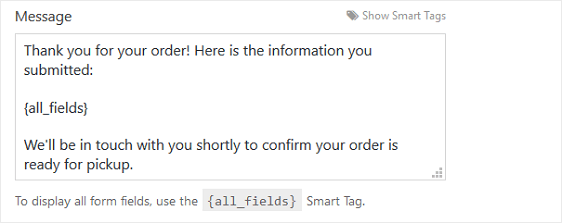
You can also customize the notification message. If you want to include all of the form field information the customer filled out on your order for, use the {all_fields} smart tag and add whatever additional message you'd like to add.
For more help with smart tags, check out this tutorial on how to use smart tags in WPForms.
Click Save.
Step 3: Configure Your WordPress Order Form Confirmations
The next thing you'll need to do is set up the confirmation message that customers will see after submitting their order.
There are several confirmation types you can set up in your forms, including:
- A confirmation message that will show after the form submission and checkout
- Redirection to another page on your website, such as a "Thank You" page
- Go to URL redirect, for times you want to redirect customers to another website
For help with all three of these options, take a look at our useful tutorial on setting up form confirmations in WordPress.
In our example, we'll set up a simple message confirmation that customers will see once they submit the order form.
First, click on the Confirmation tab in the Form Editor under Settings.
Next, select the type of confirmation type you'd like to create. For this example, we'll select Message.
Then, customize the confirmation message and click Save.
Step 4: Add Your Order Form to Your Site
WPForms allows you to add your forms to many places on your website like blog posts, pages, and your sidebar (widget-ready areas).
First let's take a look at the most common post / page embed option.
Start by creating a new post or page in WordPress. After that, click inside the first block (the blank area below your page title) and click on the Add WPForms icon.
![]()
The handy WPForms widget will appear inside of your block. Click on the WPForms dropdown and pick which one of the forms you've already created that you want to insert into your page. Select your order form.
Next, click on the blue button in the top right that says Publish. Your form will now appear on your website.
To add a simple order form to your site in the sidebar widget area, go to Appearance » Widgets.
So then, add a WPForms widget to your sidebar. And after that, select the Billing / Order Form from the drop-down menu and save your changes to the widgets area.
Click Save in your online order form creator. You're all set! You may also want to try connecting your online order form to your small business CRM software to stay extra organized with your workflow.
Click Here to Start Making Your Online Order Form Now
Access The Online Order Form Template Now
And there you have it! You now know how to create a simple order form in WordPress both with or without online payments, using WPForms as your order form builder.
Want to start making more money off your own website? You may want to check out our post on the best WordPress affiliate plugins.
Don't wait to start building your online order form. Get started with the most powerful WordPress form plugin today. Looking for a free order form? WPForms Pro comes with a free online order form template and a 14-day money-back guarantee.
And don't forget, if you like this article, then please follow us on social media with Facebook and Twitter.
How To Create A Job Application Form In Wordpress
Source: https://wpforms.com/how-to-create-a-simple-order-form-in-wordpress/
Posted by: gordonopoetinat1997.blogspot.com
0 Response to "How To Create A Job Application Form In Wordpress"
Post a Comment