

How To Create Candle Wax
Home is the place we feel the most like ourselves—where we kick off our shoes, share our meals, and make memories. We're taking our love for all things home and bringing it to Instagram. Follow along at Home52 and make yourselves—well, you know.
At some point in the 2000's, candles went from nice-to-have-around to a home decor status symbol, thanks to the onslaught of luxury perfumers and candle-makers. Since then, there's a lot of conflicting opinions about whether or not upwards of $50 is an appropriate amount to spend on something that lasts a collective 2-and-a-half days. Apartment Therapy even categorizes this phenomenon as "Questions We All Have," because so many of us are astonished by the cost involved in candle procurement.
Since one of my favorite comforts is lighting my home with the warm glow of candles, I'm no stranger to this shift. In past years, this has meant trying to make a few precious, expensive jar candles that I received as gifts last as long as possible—but this year I have a much larger collection: an assortment of soy wax candles I've made myself.
Soy candle making is a quick, fairly inexpensive project with tons of room for your own preferences and creativity to show—in my eyes, the ideal DIY. Supplies to make dozens of candles can be had for the price of just a few expensive store-bought ones, and they are wonderful as gifts for a host, in care packages, and for the holidays—you'll never lack eager recipients for your experiments!
The process is at once simple and complicated. It's easy to get started; making a batch only takes an hour or so, the supplies are relatively few, and cleanup is easy. But at the same time, getting the perfect result can be tricky. This recipe is just a starting point—there are many variables in candle making, from container and wick size to wax brand to the varying properties of essential oils. It's a great project to revisit over time, as you tweak your ratios, troubleshoot, and come up with favorite scent blends. Consider this both a beginner's guide, and one to return to when you're looking to go back to candle basics as an intermediate or advanced maker.
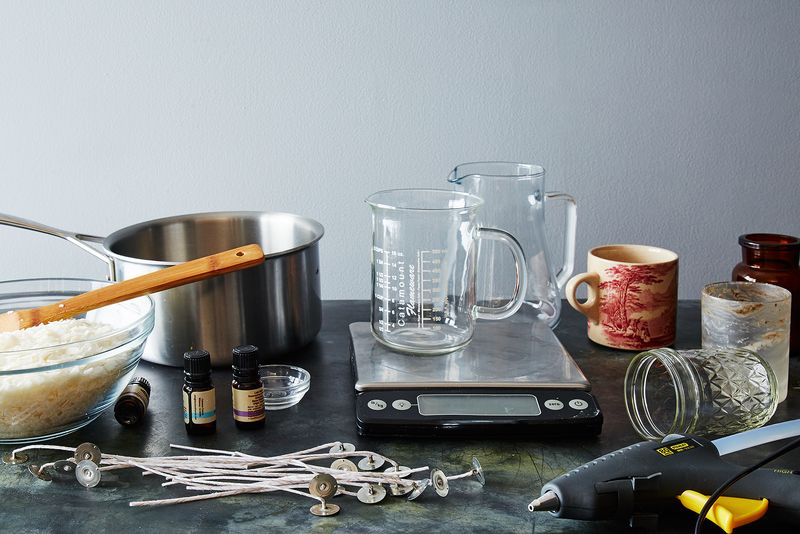
What you'll need:
Candle containers (heat-proof jars, glasses, tins, etc.)
Pre-waxed, pre-tabbed wicks
Soy wax flakes
Superglue or hot glue
Melting pot, heat-proof pitcher, large glass heat-proof bowl, or old saucepan
Large pot, to use as a double boiler
Mixing spoon
Scale
Candy thermometer
Masking tape
Paper towels
Fragrance oil or essential oil (optional)
Small container, for weighing fragrance (if using)
First Thing's First: Choosing Candle Containers
Get creative with candle containers! I've used mason jars, drinking glasses, tins, the containers from candles I previously purchased and used up, and even a small ceramic flowerpot. Thrift and vintage stores can be great places to find matching sets of glassware. Teacups and small bowls can work, too. As long as the containers you choose are heat-safe, go wild! Most glass and ceramic vessels are heat-safe, so that's a great place to start.
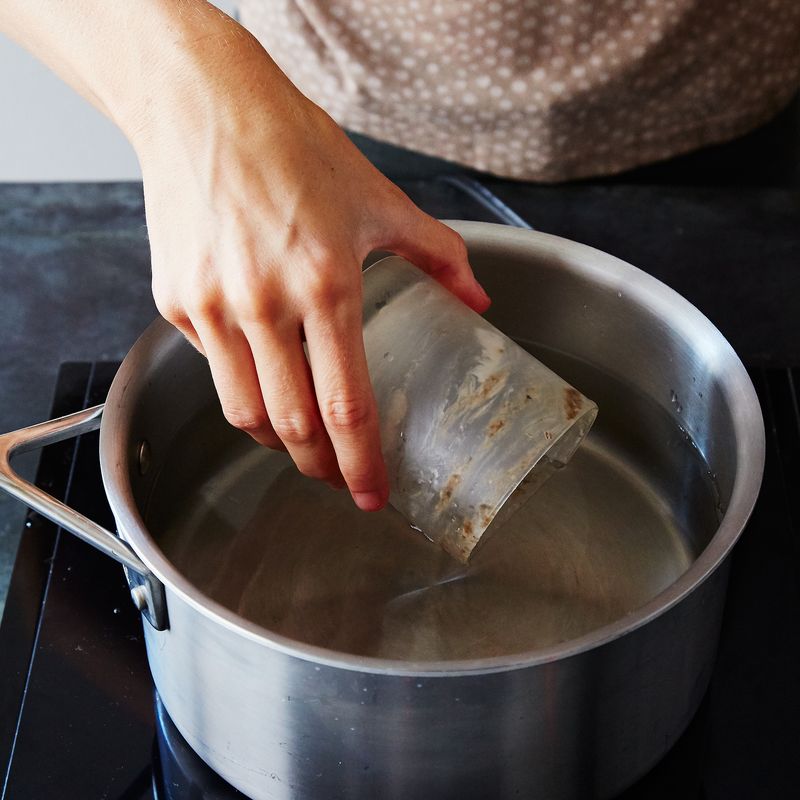
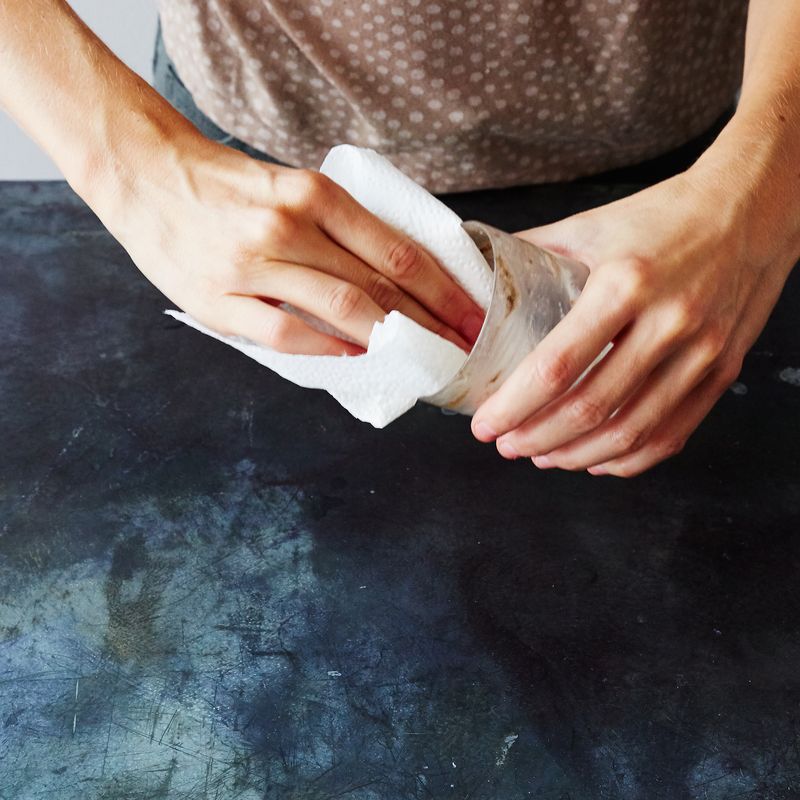
If you want to reuse an old candle container, just place it in simmering water until any remaining wax is melted, then wipe the container out with a paper towel and remove the wick (you may need to gently pry it out with a butter knife, depending on how it is attached).
Determining How Much Wax You Need:
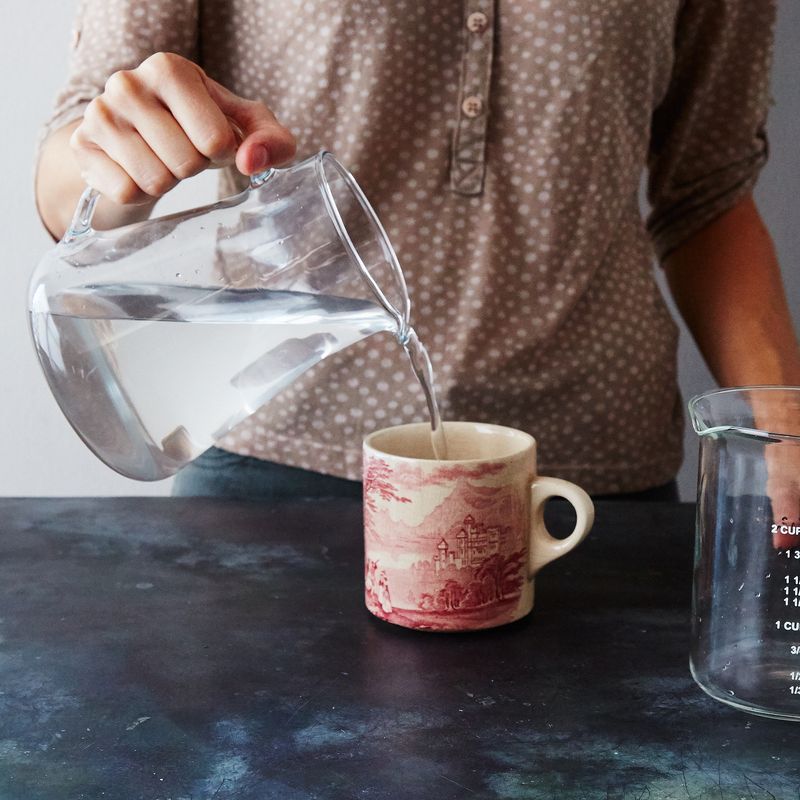
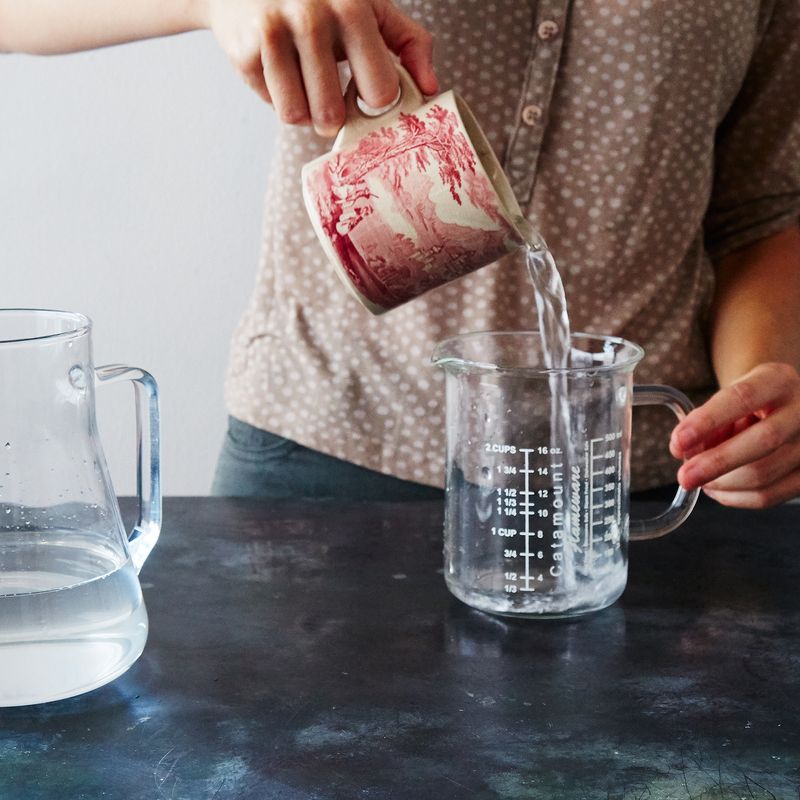
To determine the amount of wax to use, you'll need to know the volume of your containers. To avoid any pesky math, I do this by filling the container with water then pouring it into a measuring cup. You might be tempted to skip this step and just guess, but it's the easiest way to be sure you're not wasting any wax and helps immeasurably when you're making a whole batch of candles.
Choosing Wick Size:
The best size of wick to use depends on several factors, including wax brand, container size, and amount of fragrance used. Many wick manufacturers offer online charts to help you determine a good size to start with (here are a few resources: 1, 2, 3, 4). When you test your finished candle, it will be clear if your choice was too big (a sooty wick that is hard to extinguish) or too small (a melted pool that doesn't make it to the edges of the candle), and you can adjust from there in your next batch.
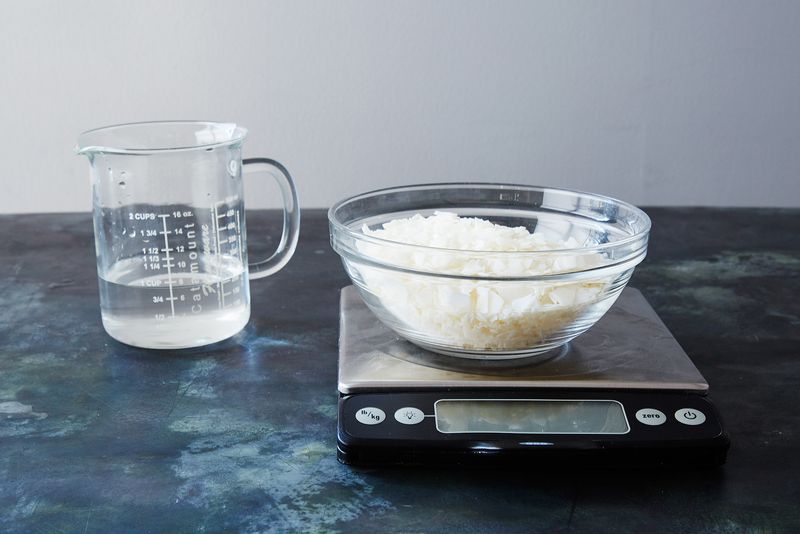
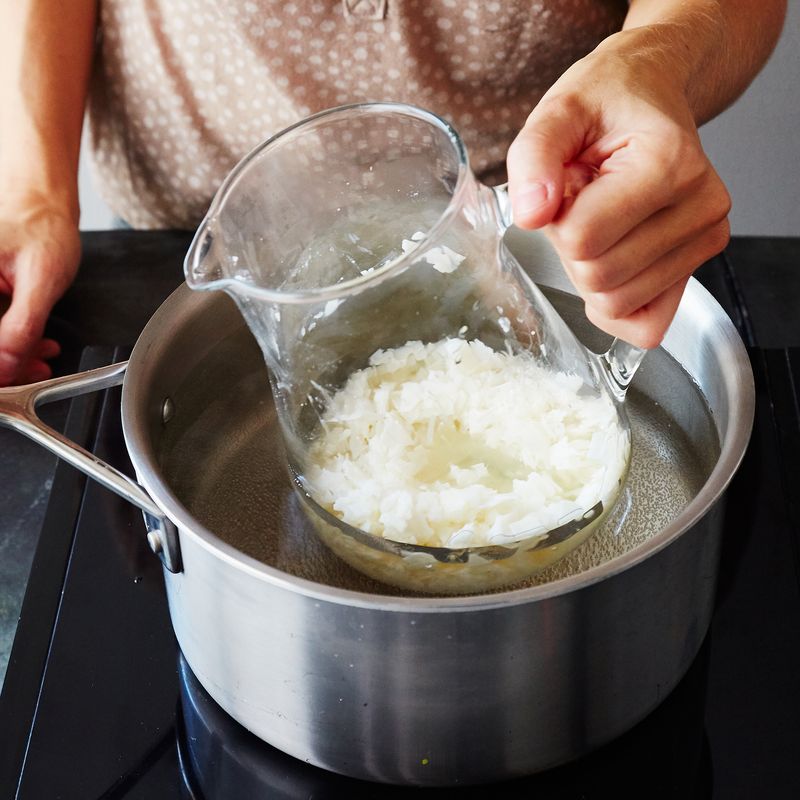
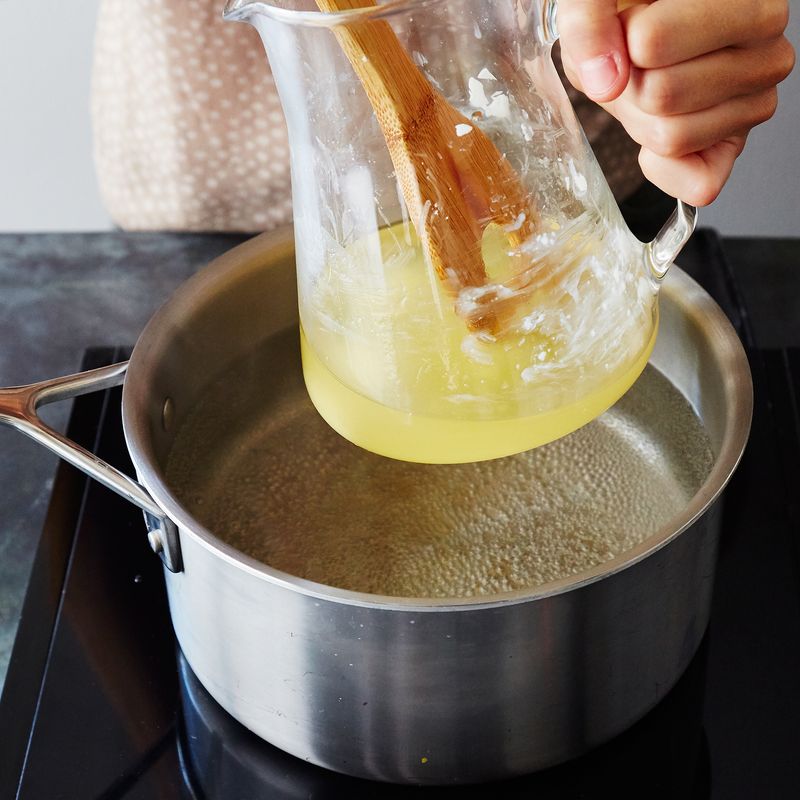
Step 1: Weigh and Melt the Wax
Place your melting pot, bowl, or saucepan on the scale, zero it, and weigh in the correct amount of soy wax flakes. For every 1 fluid ounce (in volume) your container or containers hold, you'll need approximately 1 ounce (in weight) of soy wax.
Fill a large pot halfway with water and bring to a simmer on the stovetop. If you're using a melting pot or pitcher, lower it directly into the water; if you're using a heat-proof bowl, set it right atop the pot like you're melting chocolate. Allow the wax to melt, stirring occasionally. This can take a few minutes to get going, but have patience!
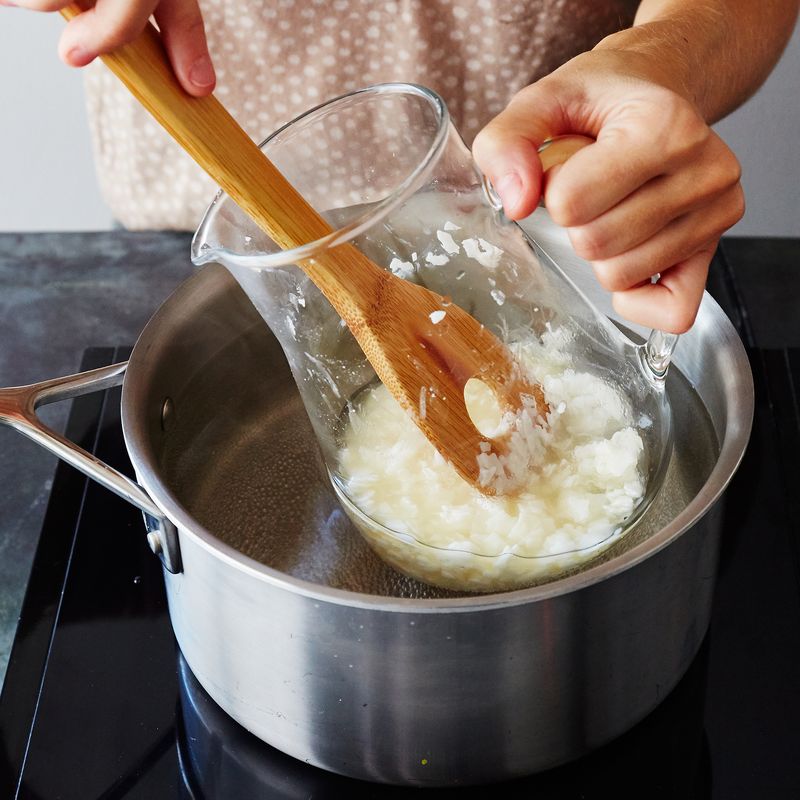
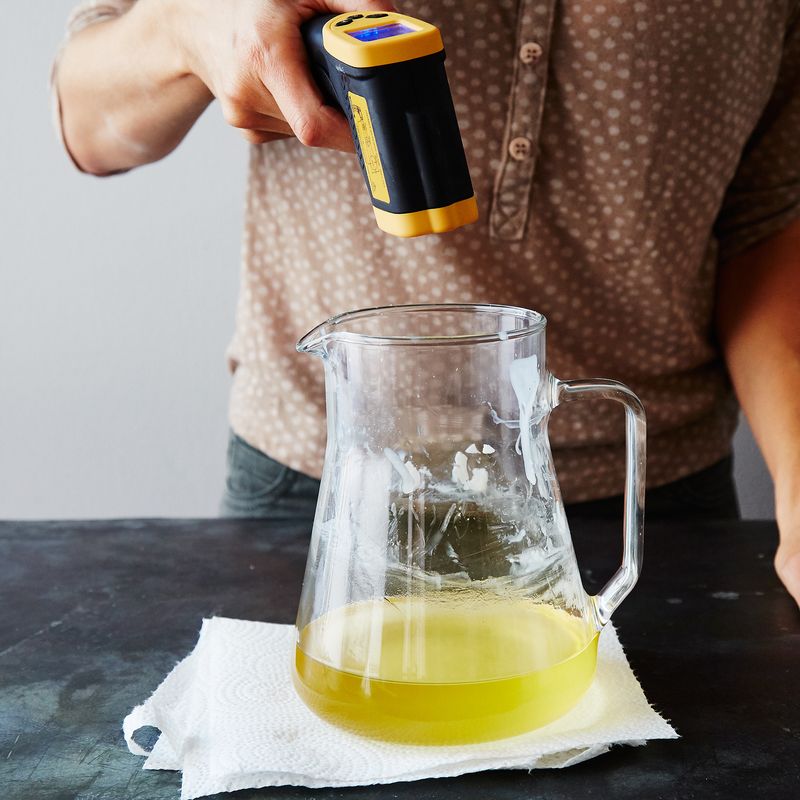
When the wax is fully melted, it will look similar to olive oil and will likely be around 180ºF in temperature—but it's not ready yet! Allow the wax to cool to 140ºF before adding fragrance or pouring the candles.
Step 2: Prepare the Candle Containers
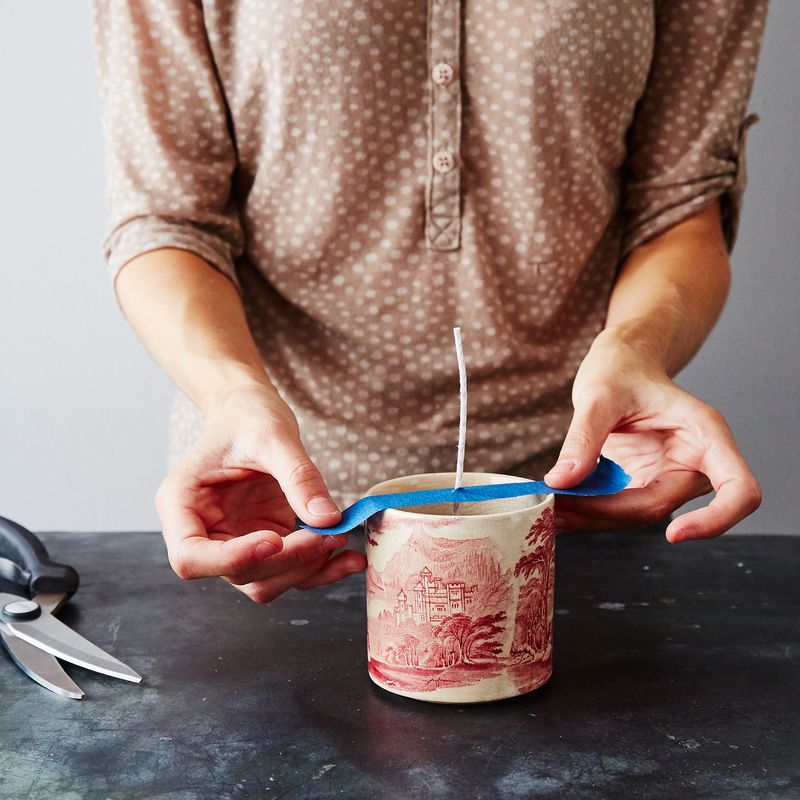
While waiting for the wax to cool, prepare the candle containers. Make sure each container is clean and dry, then place a dab of superglue or hot glue on the metal bottom of a wick and press it to the bottom center of the container. If you have a container with a wide diameter (like a bowl or flowerpot), you may want to use two or three evenly-spaced wicks to ensure the candle can burn evenly.
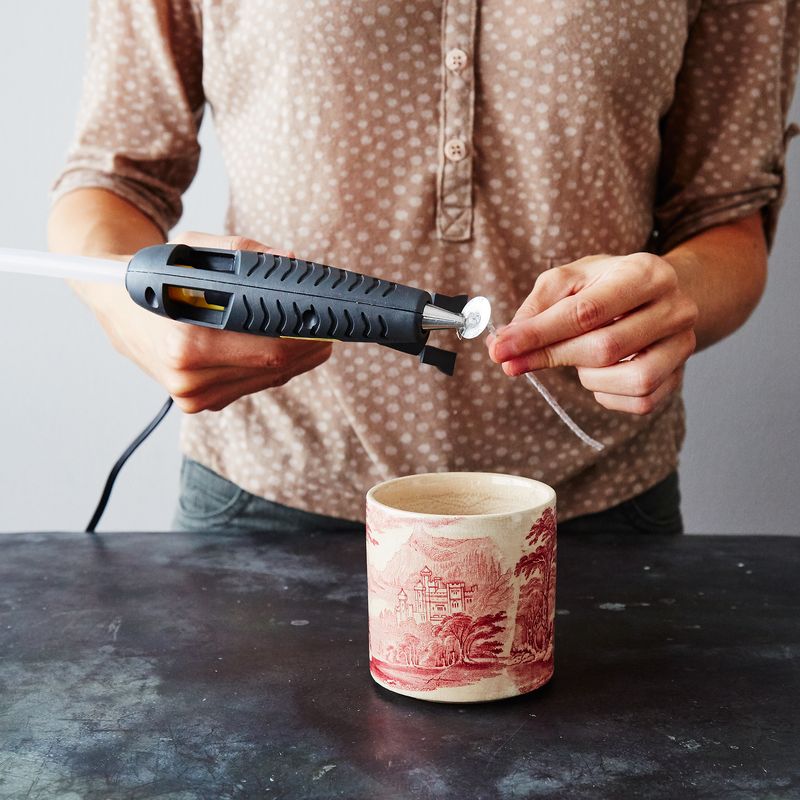
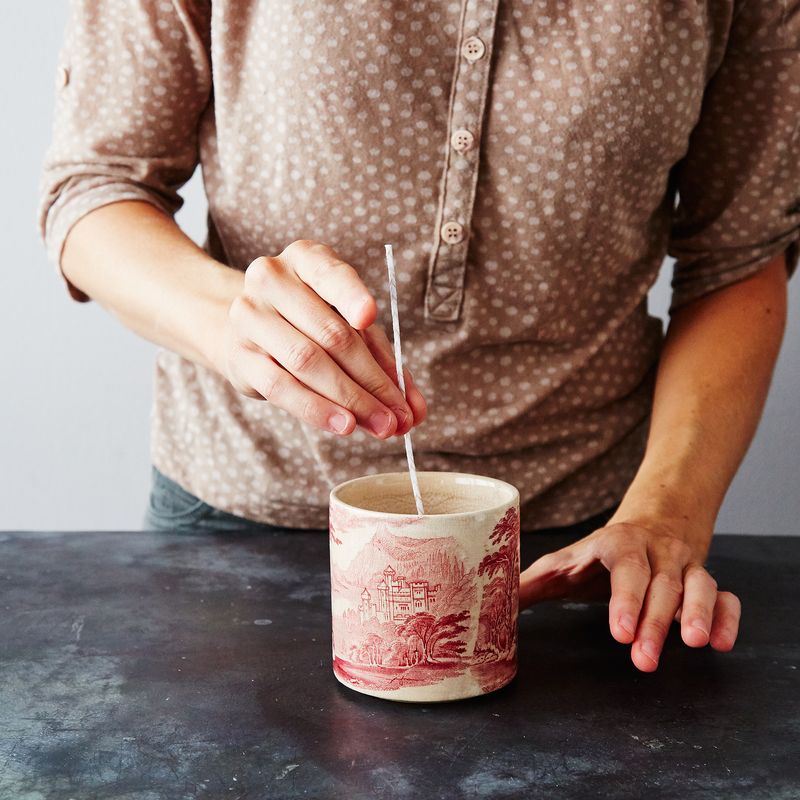
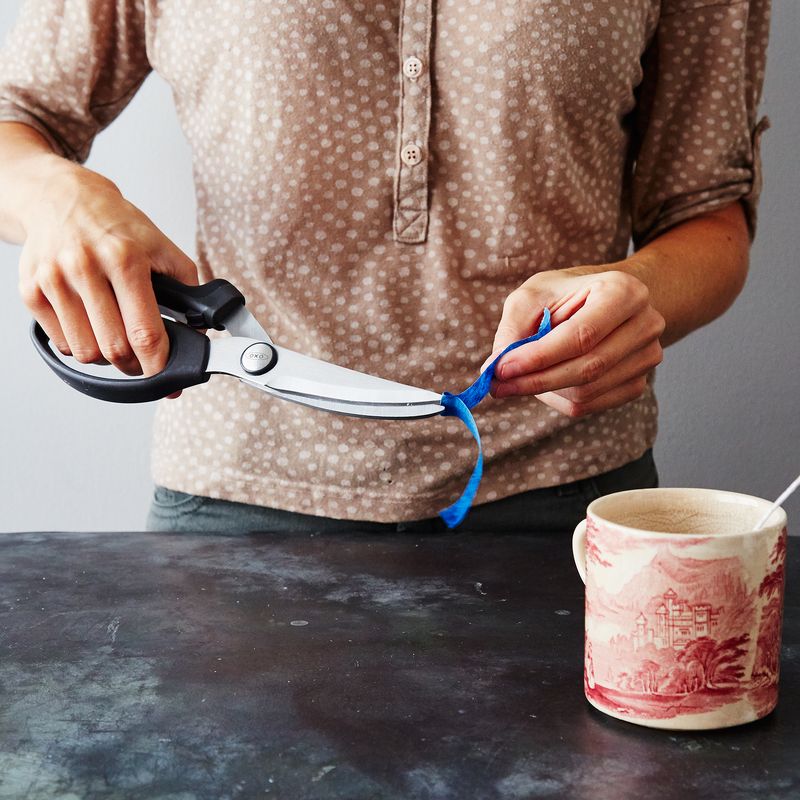
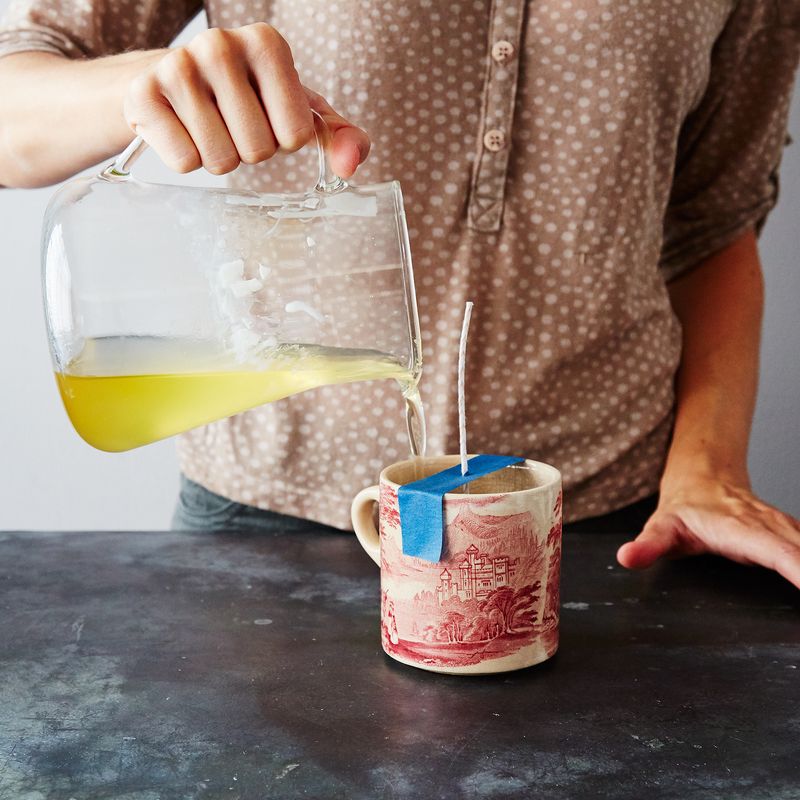
It's helpful to stabilize the wick to keep it straight and in one place as you pour the wax. My favorite method is to snip a hole in the middle of a piece of masking tape, guide the top of the wick through the hole, and attach the tape on each side of the container's rim.
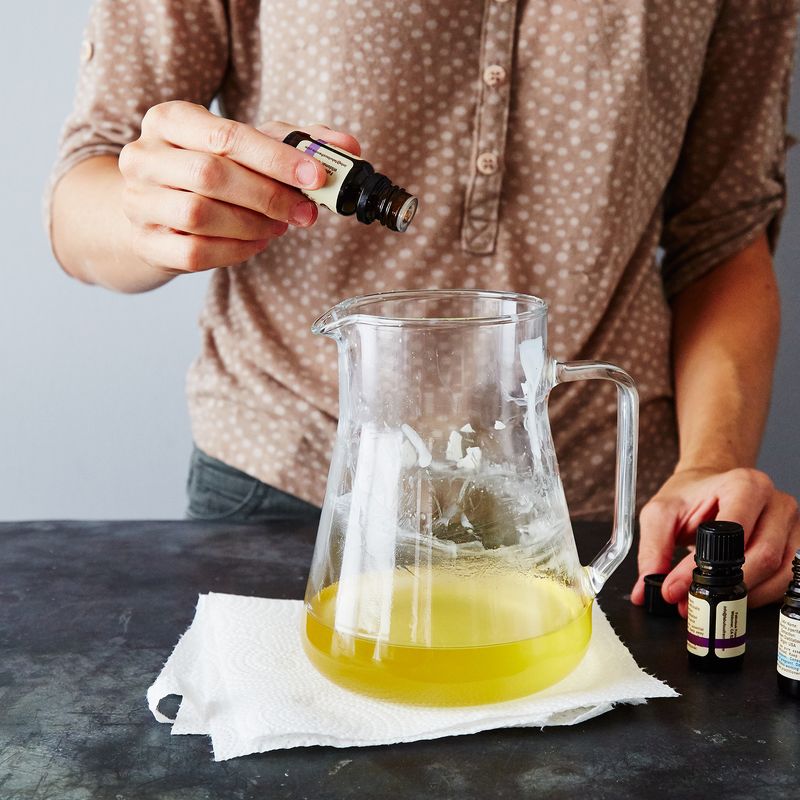
Step 3: Weigh the Fragrance
If you're using fragrance oil or essential oil to scent the candles, weigh it out into a small container at a ratio of 1 ounce fragrance per 1 pound of wax. Pure essential oils are trickier to work with than fragrances, with properties varying from oil to oil. With exceptions, they usually create a weaker scent than fragrance oils. If you use essential oils you will need to experiment over time to determine your ideal blends and ratios, but I usually start with the above ratio, then adjust in the future if I am not satisfied with the result. Note: The oils will smell much stronger in the melted wax than they will in the dried, burning candles.
Once the wax has cooled to below 140ºF, stir the fragrance into the wax.
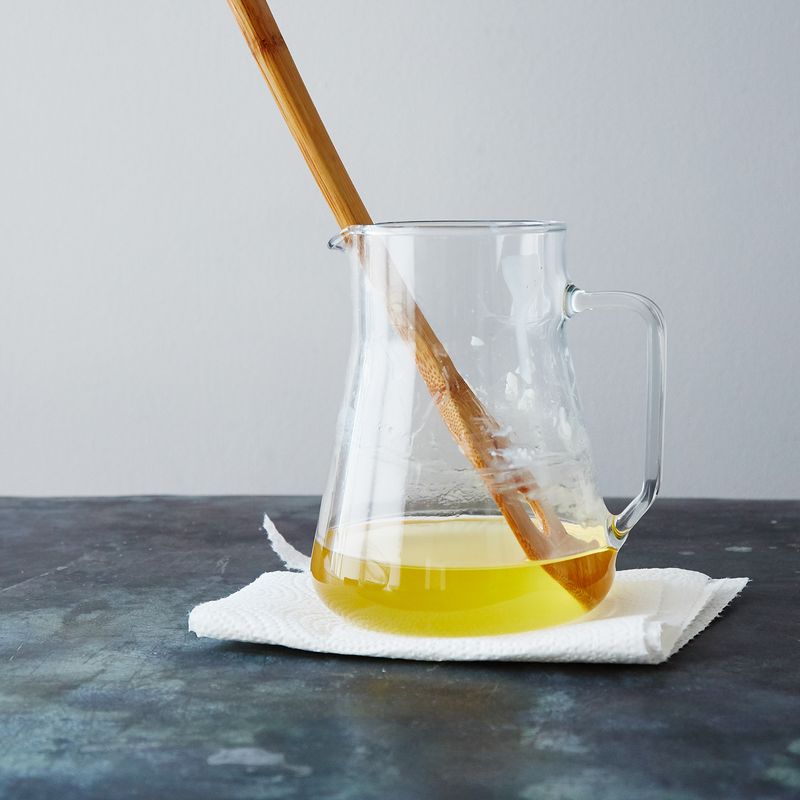
Step 4: Pour the Candles
Candles can be poured at a variety of temperatures with different results, with variables including the brand of wax and the size and material of the container. A good range to start with is 120º to 140º F—you could even pour several candles in your first batch at different temperatures to see what works the best for your setup. For the batch of candles pictured, wax was poured at a number of temperatures in that range and they all came out well.
When the wax has reached the desired temperature, carefully pour it into each candle container, avoiding the tape and wick. Pour slowly to avoid creating air bubbles, which can make the surface of the finished candle look uneven. Let the candles cool at room temperature for at least 24 hours before burning.
Some Things to Remember:
Cleaning up is easy as long as you get to it while the wax is still liquid. Just use paper towels to thoroughly wipe the remaining wax off of the stirring spoon, thermometer, and inside of the melting pot before washing normally.
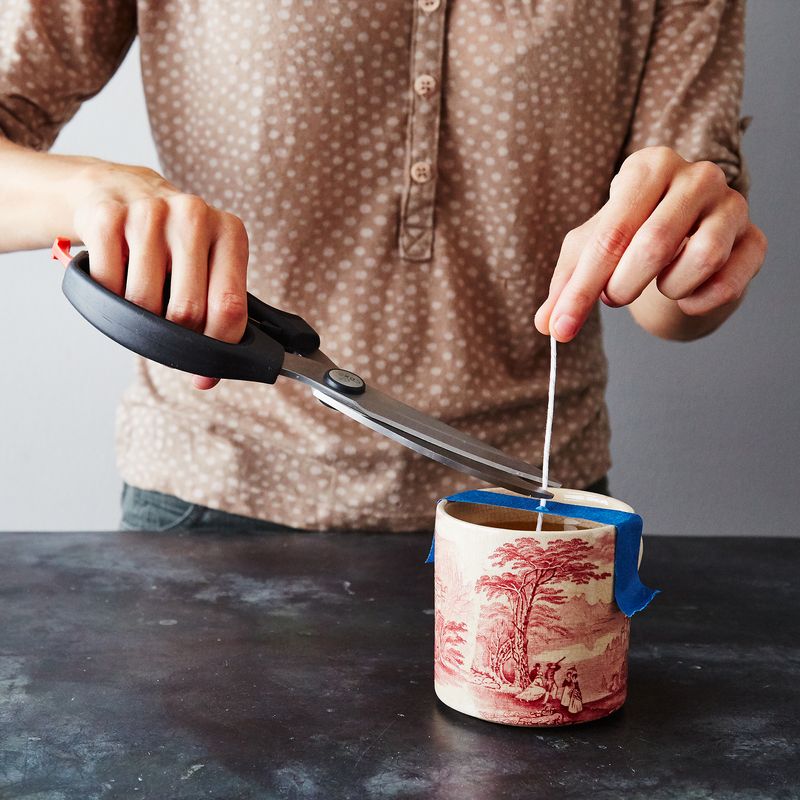
Once the candles are fully cooled and hardened, remove the tape and trim the wick to 1/4 inch. Be sure to continue to trim the wick to this length before each time you light the candle to prevent the wick from "mushrooming" and smoking, and follow other standard candle burning precautions: Keep them away from children, pets, and anything combustible, make sure the surface the candle is on is stable, and never leave a burning candle unattended.
One tip to be aware of when burning soy candles is to match your burn times to your candle size. Too many short burns in a row can lead to "tunnelling," in which the wax melts only in the center of the candle rather than all the way to the edges. The first time you burn a new candle, leave it lit long enough that the entire top of the candle is liquid, and in general avoid burning large candles for brief periods of time too often. If you only have a short time, choose a candle with a small diameter.
If this all seems like a lot of troubleshooting, take heart—even my lumpiest candles have still burned beautifully. Though it may take take some experimentation to achieve the perfect smooth top or ideal scent intensity, every batch along the way will likely still result in something beautiful for you or someone you love. Enjoy the process of learning and testing, and stay cozy!
This article was originally published in 2015, but the Editors at Food52 have updated it to include a step-by-step video to make this a totally doable weekend project.
What containers are you going to turn into candles? Let us know in the comments!
Photos by Bobbi Lin.
How To Create Candle Wax
Source: https://food52.com/blog/14170-how-to-make-soy-candles-from-any-containers-you-have-on-hand
Posted by: gordonopoetinat1997.blogspot.com
0 Response to "How To Create Candle Wax"
Post a Comment